ADJECTIVE ‘made, done, or happening without method or conscious decision’.
Sounds about right.
Since this site is like my virtual melting pot (aka dumping ground), I figured I needed a place for the other crap… You know, the non-essential shit that doesn’t really fit in to any other category here. And just like that; Voilà! A page was born! (Nope, I’m not French, I just swear an awful lot – you have been warned *lol*) Not entirely sure what I’ll be putting here. Judging by the imaginative title, random stuff, apparently. Wonders will never cease.
Anyway, that’s about it for the intro post. *steps down off her soap box and skulks back into the shadows to the chrous of a thousand crickets*
I can’t help it. When I think of the word sail, I think of this song… Or this one. But if we’re being technical I didn’t actually sail. Since I was on a cruise ship I guess the correct terminology is cruise. No cheesy song immediately springs to mind. Yet.
The ship we boarded was named Sun Princess, and here’s a fun fact for anyone over 40; the 1970’s/1980’s TV show ‘The Love Boat’ was actually filmed, in part, on that very ship. The ship catered for over 900 staff and almost 3000 passengers, and at 14 decks high (there is no deck 13, sailors are a superstitious lot) it felt like a floating apartment block! (Another fun fact; The Sun Princess is actually one of the oldest in the fleet and is being decommissioned next year, and is also markedly smaller than the newer models both already released and those yet to come. Incredible!) Since there is SO MUCH to cover I won’t go into everything, just touch on the highlights for the most part. Things to know; cash isn’t used on the ship. You put money onto your cabin card, which is a plastic card you wear around your neck on a lanyard, and use like a VISA card, and different colour cards dictate your level or class in the Princess Cruises universe; Blue are the noobs, Gold are on their 2nd+ cruise, Ruby, then Platinum, then Black. And all of this basically tells you at a glance which of your fellow passengers has the most cruises or cruise time (since you gain “points” the longer you cruise) under their belt. And there is always something to do, so no one can ever truly say they can be bored on a cruise ship. We attended trivia shows, game shows, watched movies, theatre productions, saw bands, went shopping, dined in 5 star restaurants, went to the library and internet café, and lay out sunbaking on a deckchair listening to the waves and watching dolphins… and yes, we saw dolphins on day 2 swimming right alongside the ship!
Boarding the Sun Princess… note the crew in orange at the far right for size comparison!
This cruise was my first and lasted 10 days in total. We sailed out of Sydney, Australia, at the same time that Tropical Cyclone Oma was expected to make landfall in Brisbane. By the time we got there 2 days later the cyclone had been downgraded to an ex-tropical cyclone, but the port of Brisbane was still closed so we couldn’t port, and instead stayed out at sea – and even earned a one-off payment of $76.00 from the cruise operator as a kind of apology for not making it to land; bonus! For riding Oma’s coat tails, the seas were notably choppy, and for me voyaging off on my first cruise the constant lurching and rocking was very noticeable, but not to the point I felt sick. My parents, whom bought me along on this merry jaunt and actually paid for it at a discounted rate (pay for 2 and the third person is cheaper), had been feeding anti-sea-sickness pills into me from the night before we boarded, and happily I can vouch I was never sea sick once during the entire cruise, despite the initial rough seas.
The Sun Princess waiting outside the Whitsundays.
The main destination was of course The Great Barrier Reef just off the coast of Queensland, Australia. The entire reef is so long at over 2000 kilometers long and made up of so many smaller islands and reefs that you’d need a lot longer than 10 days to even see part of it; and due to conservation and such a lot are closed off to the public. Not that I minded at all, just seeing it in the flesh so to speak was amazing! On about day 4 of the cruise we arrived at Airlie Beach and were directed onto a catamaran (identical to the blue and white boat on the bottom right hand side of the above picture), and from there set off for the Whitsundays, about an hour and a half away. The waters on the channel right beside the barrier reef were incredibly choppy, and we were tossed about like rag dolls for part of it. I tried to think of that part as an adventure, but my mum wasn’t so enthused and buried her face in a towel for much of it. There’s a journey neither of us won’t forget in any hurry.
We arrived at a huge pontoon anchored to the sea floor at the aptly named Hardy Reef. Perhaps the only thing better than diving in Hardy Reef would have been diving on/in/through another Hardy (actor Tom Hardy, but we can’t have it all can we? Ah well, a girl can dream, and did… incessantly). Queue all the dirty jokes about Mr Hardy and the word ‘wet’… *ahem*
Heart Pontoon at Hardy Reef. Competition be fierce, yo!
Our catamaran was docked for about half hour before we were joined by a second, and the pontoon went from bustling to choked in an instant. Since I’ve never snorkelled before either, I made one of those spur-of-the-moment decisions and decided right then to try. Right there. On a pontoon, an hour and a half from land, surrounded by 300 or so complete strangers, and my amused parents. My step-dad shared my enthusiasm and ran off to find a wetsuit as I did the same, leaving poor mum to sit alone just taking in the sights and eating her buffet lunch complete with fresh prawns from the top deck. I found myself an instructor, was bundled into a full-body wetsuit complete with a life-vest, Fluro-green flippers and snorkel, and rushed onto a little boat of some description along with 6 or so other strangers to speed off away from the pontoon. Maybe we were only 100 or so meters out, maybe a bit further, but from there we were let off (safety step off into the water where I first started guzzling) into a narrow corridor of water roped off for all snorkelers to swim. From there we zig-zagged back. And there was a lot of kicking, slapping, and swimming into and over the top of each other (often with no apology either, damn territorial snorkelers!) which was hard for a novice like me to get used to!
Hardy Reef from the air.
Thanks to so many humans crammed into a small space it was chaotic above water. But below was just… breathtakingly beautiful. My guide led me past so many different types of coral and fish that I couldn’t stop gasping or ‘wowing’. And learning not to swallow or snort sea water was a challenge too. I swam amidst all these brilliant coloured schools of fish, past very fine or branch-like, or plate-like, or brain-like coral, and waved my hand at massive clams bigger than my torso to watch them slam shut with the movement of water. And I was so awestruck I kept sticking my head forward/down too far and using that snorkel like a massive straw. In the end I swallowed and inhaled enough sea-water to drown a small Ethiopian village (not quite), but I had one hell of an experience. I even had my photo taken underwater amidst these blue and yellow fish… who all decided to feck off just outside of the frame the minute the camera was turned my way. But still, it was amazing. One of those once-in-a-lifetime experiences that probably stays with you forever. One thing I can say; no picture or video I’ve ever seen on the Barrier Reef does the real thing justice. It truly is amazing. Better than amazing. Jaw-dropping. Everyone on the planet should see it at least once. Maybe it might help the human race appreciate the natural beauty already around us, and help clean up the waterways if nothing else!
The Great Barrier Reef. Not even stunning pictures do the real thing justice.
I probably should have been arrested at customs for smuggling sea water after inhaling and drinking so much of it, but it had another side effect that hit almost immediately: pneumonia. I became violently ill the following night and would remain so for the rest of the cruise. That wasn’t fun at all. Especially considering I was sharing a tiny room with 2 other people. I don’t know how anyone managed to get any sleep after that! The constant rocking of the ship probably had a lot to do with it. How do I explain the movement of a ship to someone who’s never been on a large one? It’s like being on a roller coaster. Those feelings you get when you move up a peak and drop down the other side; those, only less severe. You’re aware the ground is moving, and you’re not in control of it. Its those giddy gut, and gut-drop moments that you feel repeatedly day in and day out until it starts feeling normal, even relaxing. People jokingly told me would take days for me to get my land legs back after docking; it’s been 6 days home as of writing this and the feeling that the ground is moving, or more correctly my center of balance is shifting, still comes and goes even now. I giggle every now and then as I grip some non-moving surface. Maybe I’m still delirious. Proof it doesn’t take much to amuse me.
My view of Hardy Reef from the back of the catamaran.
After leaving The Great Barrier Reef, we sailed north for Cairns, and after that the town of Port Douglas; the further-most point north I have ever been. It was hot, a stinging heat that didn’t require being in the sun for very long at all before skin started turning a brilliant blistered red, and very humid. It rained a lot up north, but that’s naturally due to being located close to the tropics. My parents and I took a leisurely paddle-boat tour down the Dixon inlet, a channel of water that leads off the sea, and spotted a baby crocodile too! (But sadly, no Daryl Dixon either. Wrong country, I believe *lol*) It, the croc, not imaginary redneck Daryl or zombies for that matter, was very small; the tour guide assumed it to be about a meter or so in length, by using length of distance between eyes and nostrils above the water. We found out later that it was the wrong time of day to see them, since crocs mostly come out at dawn or dusk. Can’t complain though, at least we saw one still in the wild, as it were. Another fun fact or two, since I’m full of them (and will likely forget over time, so reading this later will be a good reminder!); did you know 20% of all persons attacked by crocs are German? That explains why so many WARNING – CROC signs start with ACHTUNG! Also, to make a male croc the water temperature needs to be 31 degrees. Any other temp and you’ll get females, that’s why male crocs are rare in the wild or why females are far more common. There you go!
Taking a little boat to meet a big ship… that looks like a little boat.
To get to Port Douglas from the ship and back again we took an even smaller boat than the catamaran, called a Tender (those little orange and white boats seen on the first and second pics of at the start of this rant). If the channel beside the Witsundays was bad, this one off Port Douglas was horrific! The waves were so bad we would ride one and smack down on the next with a jolt hard enough to throw us from our seats. And water was coming in from cracks in the hull meaning me and my stepdad got wet, considering we were in a covered-in boat. The waves didn’t even look that big, but looks, especially on this day, were very deceiving. Mum swore she’d never travel on one again. I have to agree, but maybe better judgement will be eroded over time and I’ll just seize the moment to et thrown about again. Glutton for punishment and all that.
How’s this for a view? Deck 5; the Atrium.
Back on the ship, we left Port Douglas and headed to a small island called Willis Island. It’s basically a weather station out to see manned by staff in, I think, 6 month rotational shifts. There wasn’t much to see, which was good since I slept through the visit (we slowly cruised past in an hour and I saw the photos later on my mum’s iPad). Then we headed back out to sea en route for Sydney. With 3 or 4 days at sea, we did a lot of walking the ship. I took photos like some crazy possessed Japanese tourist (apologies to any Japanese tourists I offend, if you’re possessed you probably won’t mind the comparison 😉 ). Deck 5 is the “center” of the ship; a lot of glass and polished bronze, a waterfall, gardens, and café with ocean views. Musicians played here a lot, often classical music on cello, violin, or piano. I couldn’t help myself but quote that line out of Titanic most times I heard it ‘It’s been an honour playing with you gentlemen’ say the band members playing music as the ship sinks. And we laughed every time like schoolgirls. But take those stairs up one level and you were at the shopping boutiques; a jewelry store, perfume store, clothes store, and everything-else store (that sold everything from souvenirs to band aids to chocolate and booze). Go up another you were at the casino, and one more at world renown Chef Curtis Stone’s new restaurant called ‘Share’ (we never went there, it opened the night before our cruise ended). There were 2 glass elevators here that went 3 floors and afforded great views of all 3 (looking down at the Atrium). To go anywhere else on the Sun Princess, you caught one of the 8 (I think, don’t quote me) internal lifts that would take you floors 5-14, with 5 being the medical unit and lowest we could go (below still for staff), and deck 14 being the buffet restaurant Horizons with a 180 degree view of the ship below and ocean. And the food here, OMG, free, 5 star, and to die for! Did I mention they had cake? A lot of sweets, any time of day, and again all of it was free and restaurant quality. And the menu changed daily. Seriously, hats off to the chefs. Just try not to think of the amount of waste to come from that (and 3000 fussy passengers). Seriously, just think of the cakes. Truly, I miss them. And wandering up for a free cup of tea at midnight.
Deck 10; Baja. And a long, long corridor.
With so many passengers, there’s also a lot of rooms crammed over a few floors, and the corridors that connect them all are really reaaaaallly loooooooooooooooong! (For the record our room was about half way along in this picture and to the left). I made it my goal one day to stand at one end and try and take a photo of the other end when it was quiet. But the photo really doesn’t do it justice. It’s mind-blowingly long. And that’s just one side. There was a second corridor on the opposite side of the ship on this floor (deck 10), plus others still on 9 and 11. And if you think that’s nothing, walking around the ship 3 times = 1 mile or 1.6 kilometers. Considering the lifts were frequently full and it wasn’t uncommon to have shows on opposite sides of the ship, front and back (fore and aft?), we were walking many kilometres every. single. day. Without meaning to exercise. And we weren’t even part of the daily slue of energetic souls walking and running laps every morning and afternoon after meals, especially on deck 7, where one could get dizzy lazing in a deck chair counting laps as the fit people dashed past. Just watching them was exhausting!
Deck 12; Lido, or the party place.
The one place that perhaps best defines a cruise ship, and that I will probably miss the most, is this place; deck 12. That’s where the pools, hot tubs, bars, band, and movies under the stars were. There was also a New Zealand Ice creamery to the top right, and sports activity center to the top left behind the screen (And they must have known I was coming because they put on ‘Venom’ one night, which I got to enjoy out under the stars with my blanket and free pop corn). And behind those was the gym and Lotus clinic and spa. Trying to snag a deck chair to lay about in for the day was tough going; from first thing of a morning before breakfast (before 8:00am) you would find people already out here, reserving seats, and reclining in their swimmers with tanned leathery skin. And trying to secure one of the red padded deck chairs (under balconies, left and right behind blue deck chairs) was even more challenging. These were prime real estate with people remaining in them ALL DAY. They would read, sleep, or just lay there, since seeing the screen from the wings of the ship was almost impossible. But one thing I will definitely miss is having wait staff who wandered the deck waiting for someone to hold up a hand and order a drink to bring back to them. Just wave your card and you felt like royalty being waited on. Or they’d fetch you a free warm towel or blanket to use whenever you wanted. I’m not kidding, it really was lavish living out on the Lido deck, and of a night the bars (2 in all out here, one atop the other) that was where the cool kids hung out. Or just those looking to get plastered by the pool. Trying to swim day or night was a laborious affair due to the weather conditions. It was cordoned off often due to choppy seas. I really wanted to get in but alas my pneumonia wouldn’t let me. Good thing too, or I’d probably be in hospital by now. But still, not getting in is my one regret of the entire cruise. But next time, and oh yes there will be a next time now that I’ve tasted the fine life, I’m determined I will.
An expensive view… oh, how I miss thee.
Anyway, that’s enough for now on my holiday (and no, in case you’re wondering, it didn’t turn out to be The Love Boat for me, unless we’re talking about my love affair with carbs! *lol*). I would definitely cruise again, especially knowing what I know now. It truly is like being in another world or a TV show where reality kind of takes a back seat for a while. There’s no phone calls or bills, no one unexpectedly dropping by, no need to go grocery shopping, or to go to work and be productive or have to watch the clock all day. You get to live a kind of fantasy for the duration, and believe me there are a lot of people on board who are clearly wealthy, and some who aren’t but just like to act the part. It’s very easy to get caught up in it all, which is probably part of the appeal. And with class or competition (on cruise time) rife, as well as staff always on hand 24/7 to do everything from feed to change your linen and wash and deliver your clean clothes, all while calling you Ma’am or Sir with a massive smile, it could probably become addictive too. While a great percentage of passengers on board were of the grey-haired-nomad variety, all ages were represented, including families with young kids, and young singles looking to party. I even saw one guy rocking a metal band tee shirt and a serious mullet! My biological father is looking at taking a cruise in the next 2 years to New Zealand, so maybe I’ll save up and tag along for another once-in-a-lifetime experience. I was considering a trip to the UK by then to visit a friend, but see which happens first. I haven’t been overseas in almost 20 years, so who knows. There’s a big wide world out there, sometimes it’s nice to plug back into it. But until then… *grudgingly goes back to real life*
There are a lot of guides that already exist out there in cyberspace, so I’m not preaching anything new. But if you don’t feel like sifting through search results, or you prefer static images rather than pausing a YouTube video each step, then maybe you might find this useful. Note: I’ve included screenshots for every step of the way, but don’t be put-off by thinking recolours take a lot of time or effort. The whole process actually takes around five minutes or less (depending on the size of your project). I’ve just tried to make it as thorough as possible.
Before you begin, make sure you have already downloaded and installed Sims 4 Studio (S4S) from here. There’s instructions on how to manually install at the download link, but I prefer automatic installation (because I’m lazy). You will also need an image editing program. I use Gimp, but you could also use Photoshop or some other program; it just means you will have to tailor certain steps to suit.
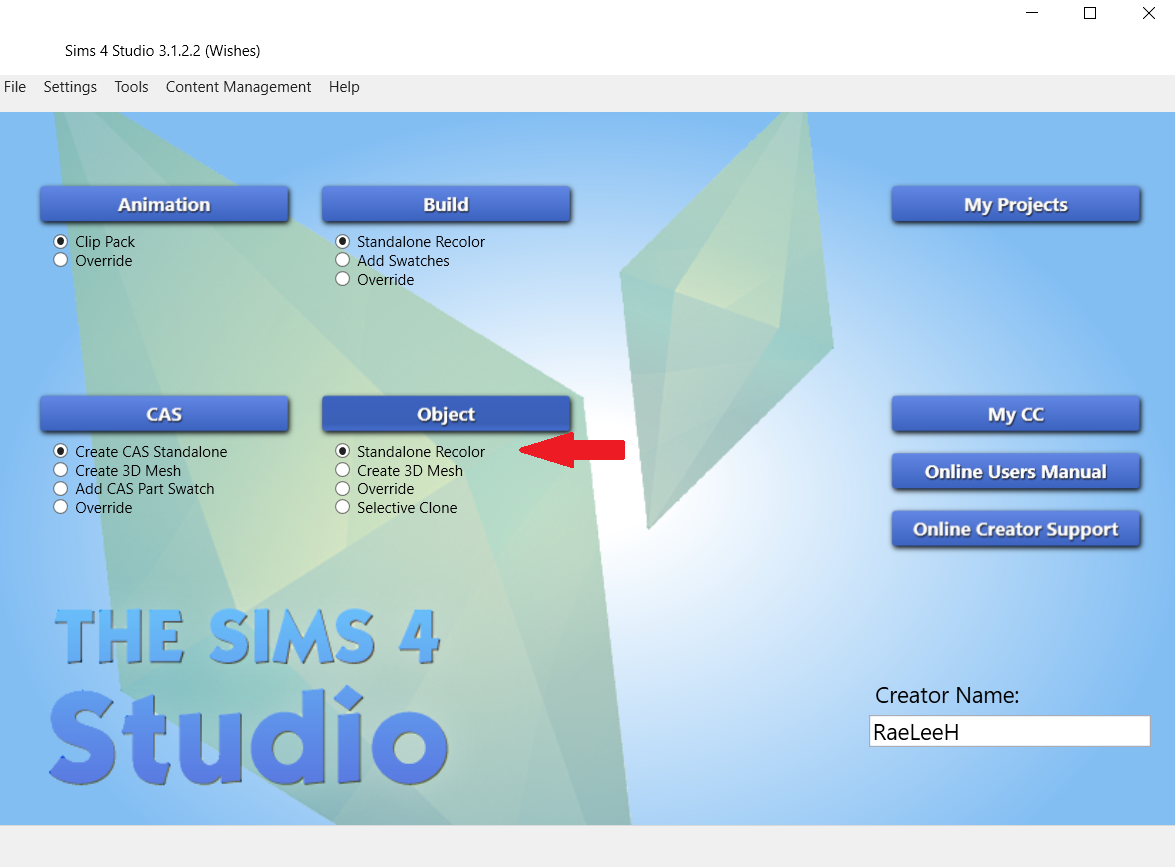
Step 1 – Open Sims 4 Studio. If this is your first time creating custom content, you will need to give yourself a creator name. You only need to do this once. Once you’ve done that, select Standalone Recolor, then select the Object button above it. Another window will open.
Step 2 – Scroll through the objects until you find the one you want. You can filter the objects by selecting the Game Pack button, or if you know the name of the object you can also type it in search. Then select Next.
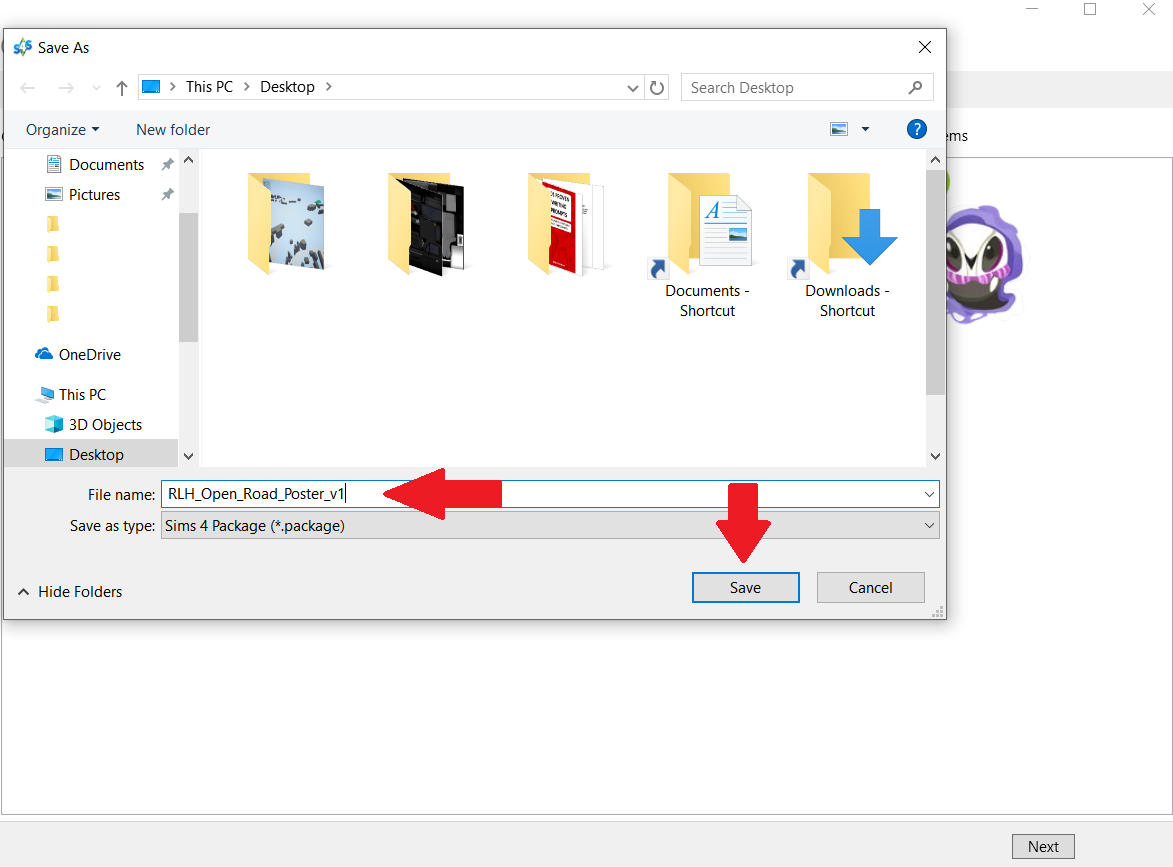
Step 3 – Give your project a name. This will be the name of the package file, NOT the name you see in the build/buy catalog. A general rule of thumb is to at least include your creator name (or some amalgam of it), as well as some sort of description of what your object is. For example, since my project is a poster I have included poster in the package file name, along with my abbreviated creator name RLH. After you’ve named it, select Save.
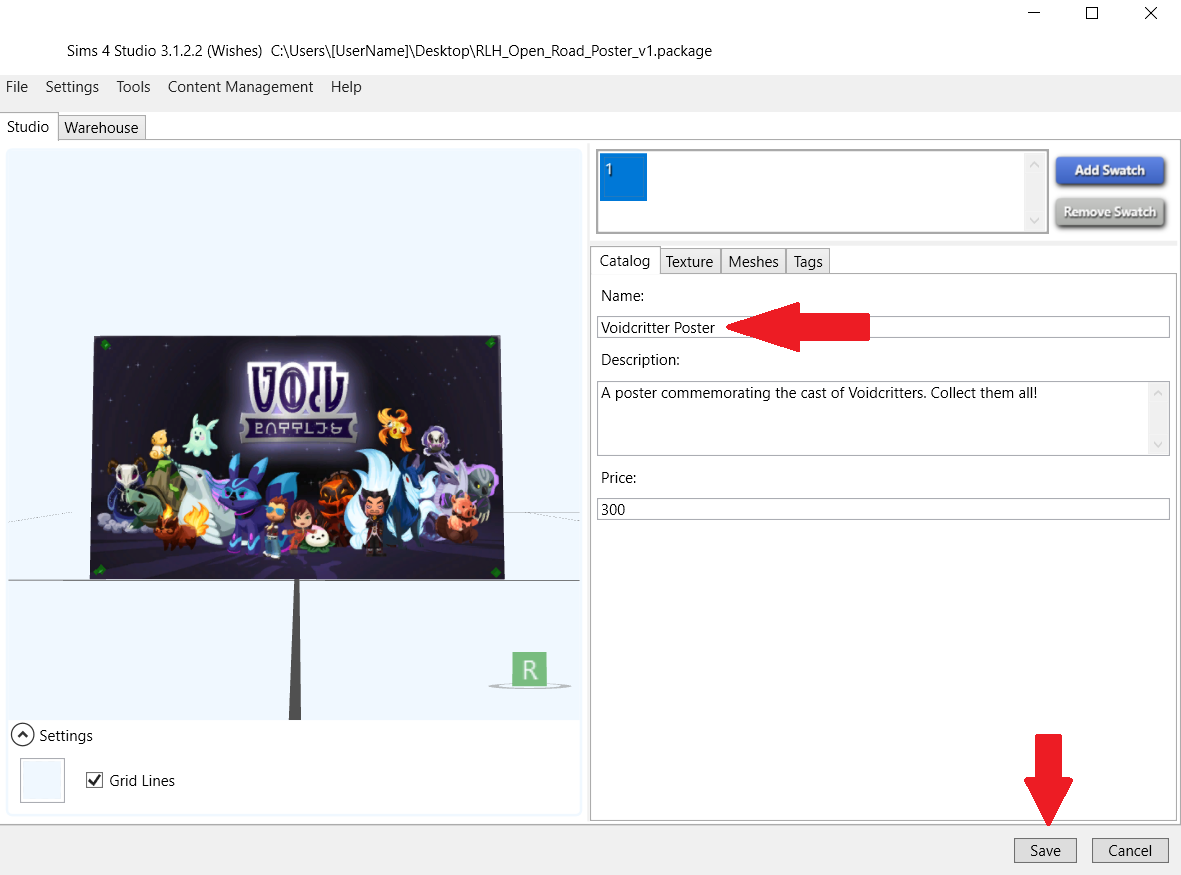
Step 4 – You should see the Studio window open (similar to above). Under the Catalog tab (the top red arrow) type in the name of your project. This is the name you will see in the build/buy catalog so choose wisely to make it easier to find in search (So for example, I changed the name of my project from Voidcritter Poster to RLH_Open Road poster. In the Description field, type in anything you’d like that will again show in the build/buy catalog in game. You can change the price or leave it as is. When you’re happy with it, select Save.
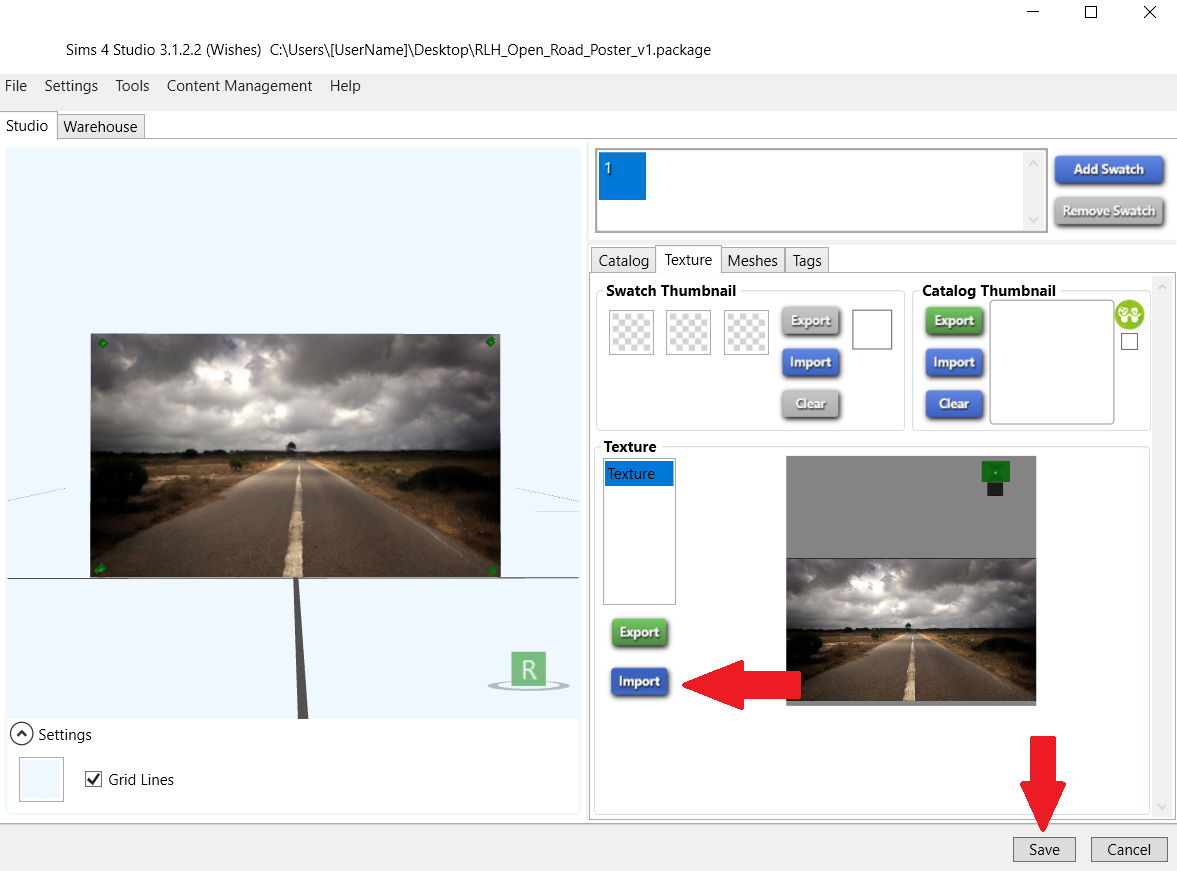
Step 5 – Next select the Texture tab (top red arrow). Beneath the texture window you will see the green Export button, and blue Import button. (For this tutorial those are the only buttons you need to worry about. Ignore the buttons under Catalog Thumbnail for now. Instructions on creating one of these has been covered in a previous tutorial and a link for it can be found at the bottom of this screen). Select the green Export button (middle red arrow).
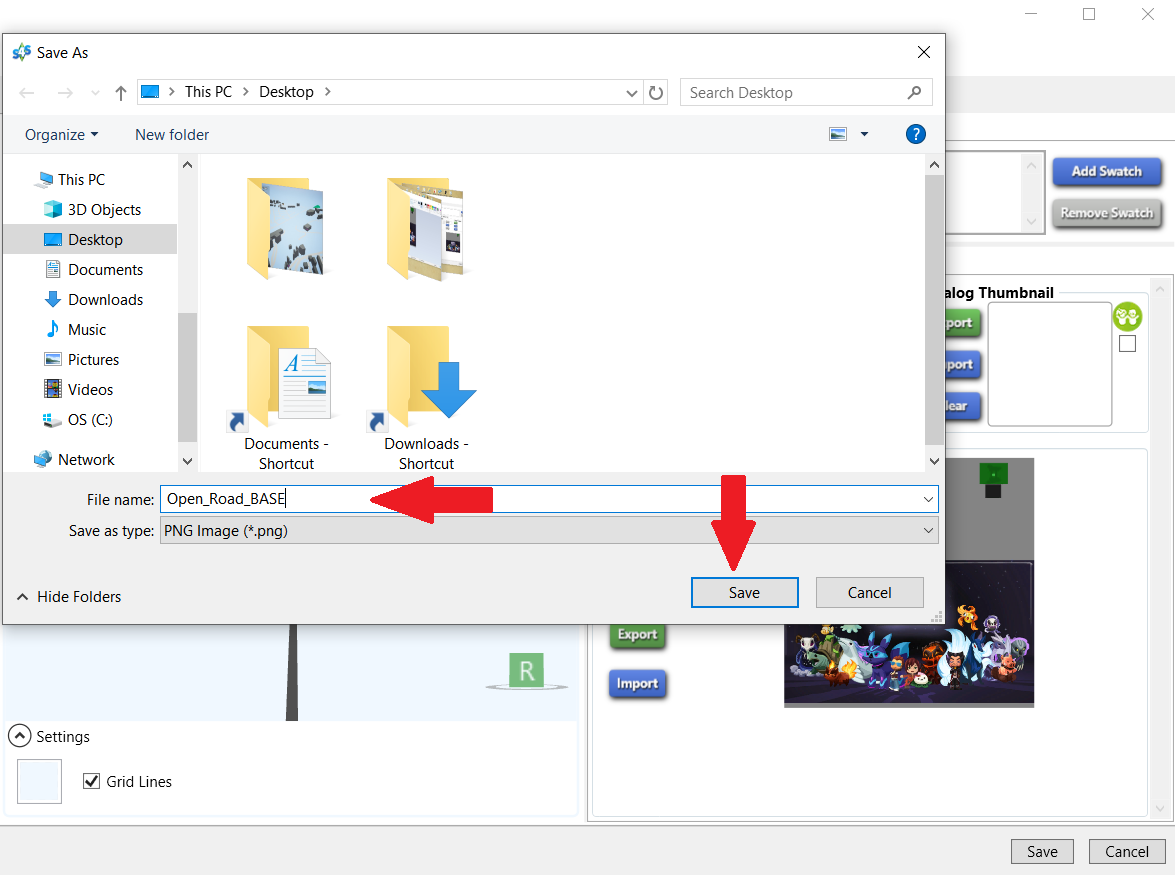
Step 6 – A window will pop up. Call your exported texture whatever you like as you will be editing it anyway. You don’t have to, but I always save it to desktop so that it’s easy to access. Then select Save.
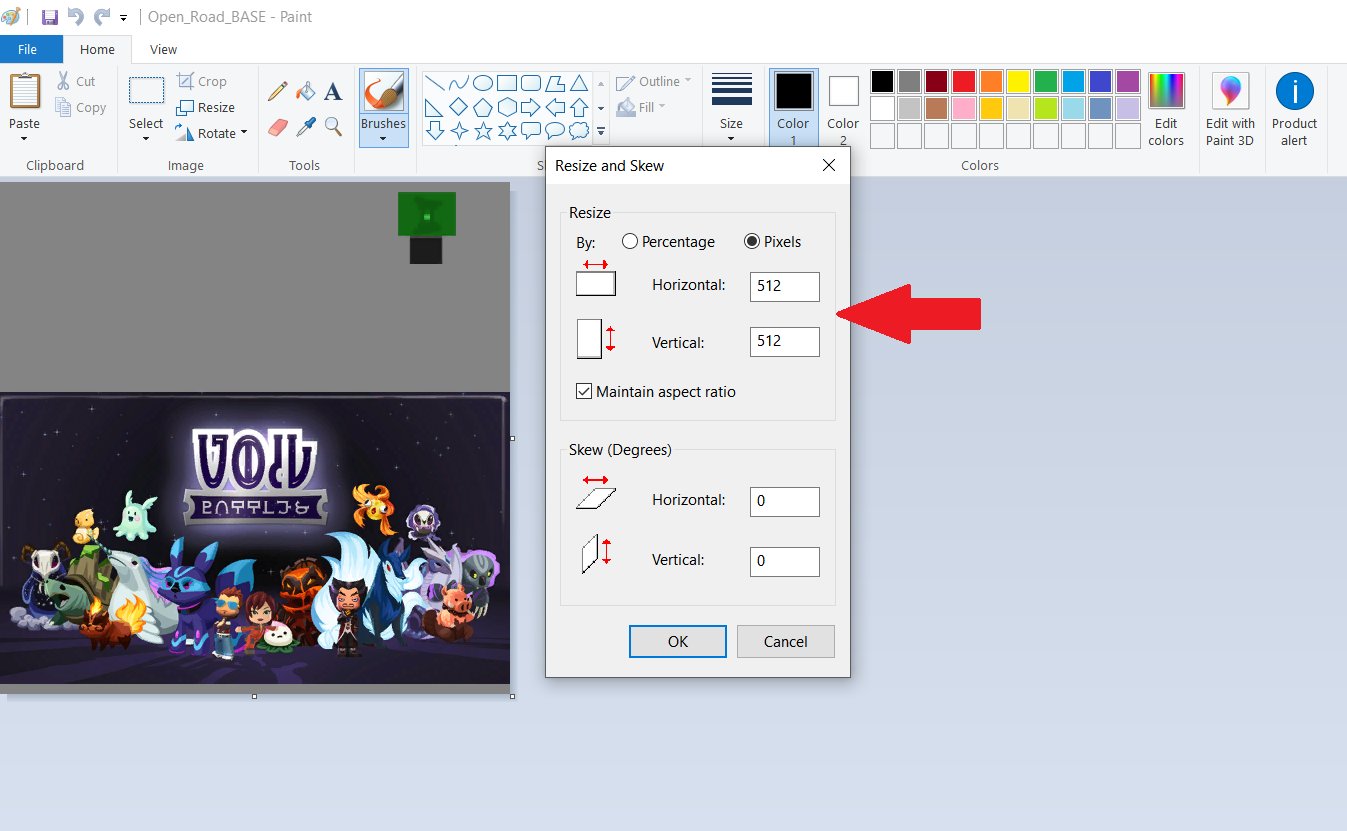
Step 7 – Minimize S4S and find your exported texture. Right-click and open it in MS Paint (or whatever editing program you wish). Resize your image to at least DOUBLE its original size. This ensures your image will appear clear in game. You can make your image 2048×2048 at max if you really want (don’t quote me on that), but I recommend against it. Generally 1024 pixels or less is more than sufficient for clear images, and won’t be so taxing on your graphics. After you have resized your image, select OK, then File > Save. Close Paint and open your newly resized export texture in Gimp.
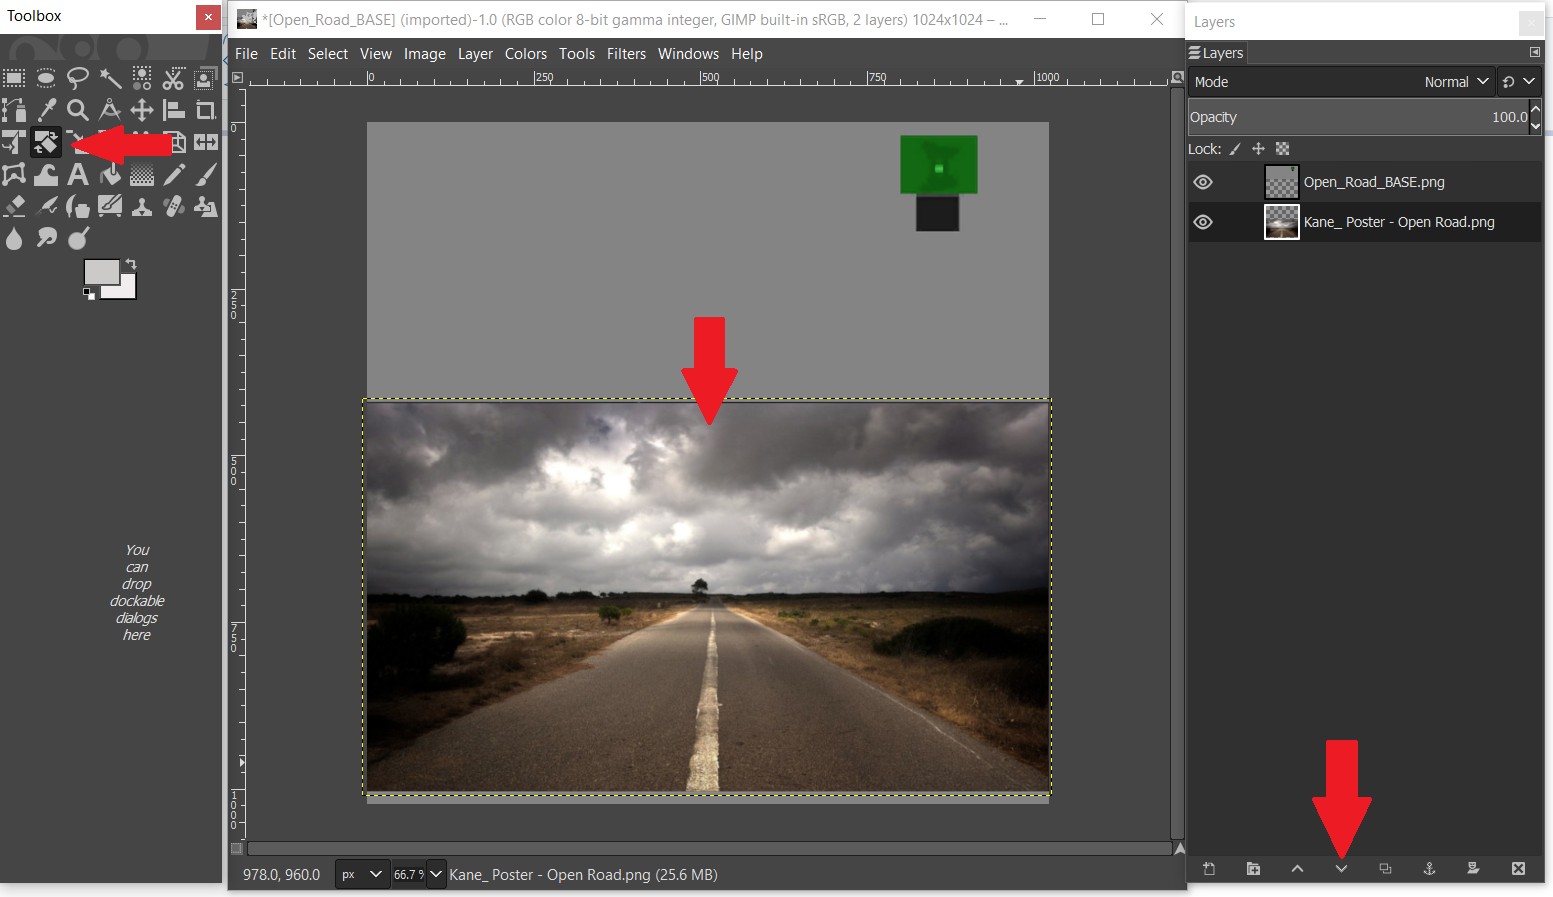
Step 8 – If you haven’t got the option open already, press CTRL + L on your keyboard to open your Layers box. Right-click on your layer (right top arrow) and select ‘Add Alpha Channel’ (right bottom arrow. If the option is greyed out it means this is already available, so click anywhere to close that pop-up). On the left hand side (Toolbox) use Rectangle Select to select the part of the image we’re going to replace (the image in the red box). Try and stick to the image border lines as closely as possible for a cleaner recolour.
Step 9 – Once you have selected the image, press Delete on your keyboard to remove it. The image should now be replaced by an alpha/invisible window. Once you see this, go to Select > None.
Step 10 – Drag your image from the desktop (or wherever you saved it) and drop it directly onto your poster. Use the Move Tool and Scale Tool to fit. Make sure it fits into that section that we previously deleted in step 9.
Optional: If your editing program allows layers, lower your image beneath the poster by selecting the Lower button (arrow down – beneath the red arrow on the bottom right hand side of the example picture). This will ensure part of the image doesn’t accidentally show on the back of the poster. This is optional however, as not all picture editing programs use layers.
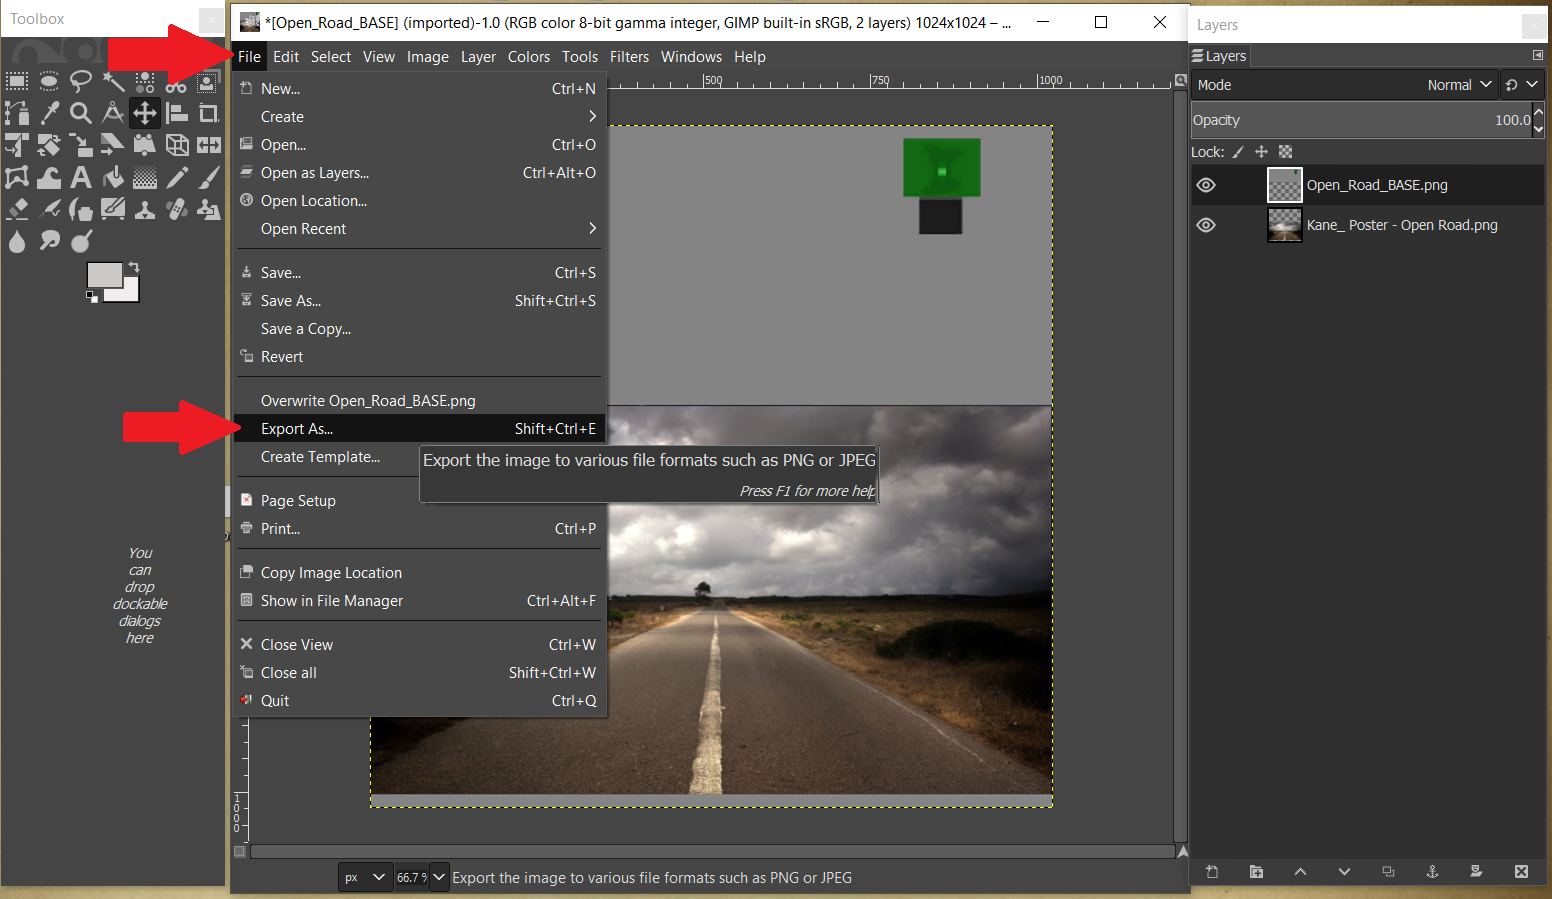
Step 11 – Once you are happy with the placement of your image, select File > Export As (In Gimp: if you try to Save As you will save an .xcf file which S4S won’t read. Export As saves the file to a .png which is ideal. If using another program, ensure the texture is saved as either .png or .jpeg). Again, ensure the image is easy to find. By default, I save to desktop.
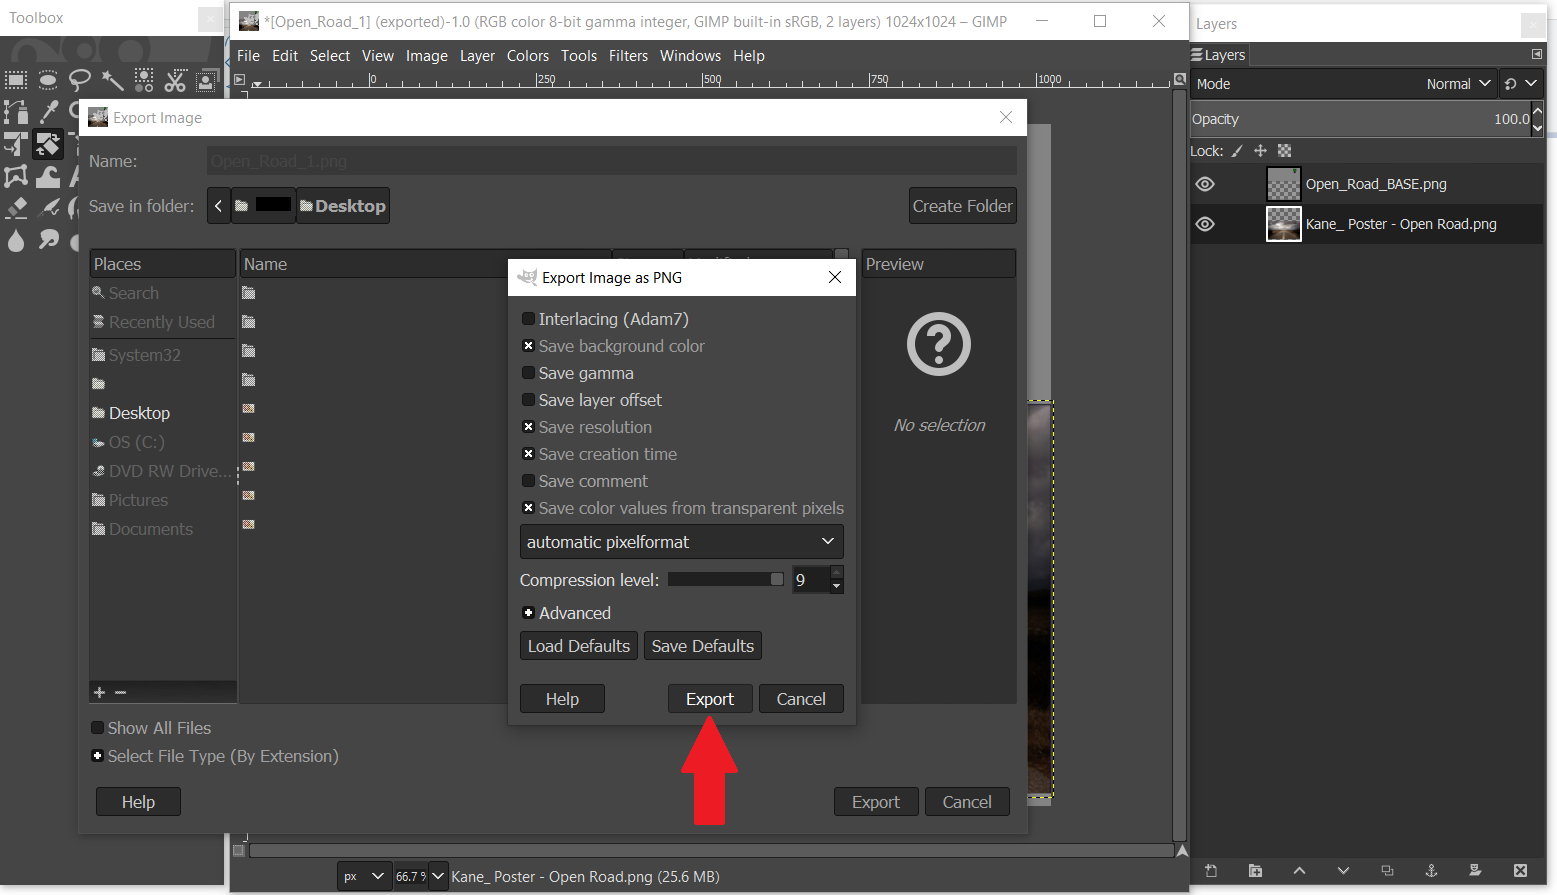
Step 12 – When a window pops up, Select the Export button. Then close Gimp.
Step 13 – Return to S4S (which we minimized in step 7). Select the blue Import button. Navigate to your image and select Open. You should immediately see the 3D poster example (on the left hand side) change from the original texture to your new edited texture. To inspect more closely; hold down the right mouse button and drag to rotate your object, scroll wheel mouse to zoom in/out, and hold the mouse button and drag to move poster around window. If you’re not happy with the image placement, or you wish to make changes, minimize S4S and re-open your image in Gimp. Repeat steps 11-13 until you are happy. To finish, select Save.
Step 14 – Close S4S and open your Mods folder (Documents \ Electronic Arts \ The Sims 4 \ Mods). Drag and drop your .package file in there. Then load your game, and search your build/buy catalog to test.
One last thing: If you want to make a custom thumbnail swatch for your new object (either to give your recolour a more “polished” look, or to make it easier to see in the build/buy catalog), see the previous tutorial here.
So that’s it! Hopefully this helps someone, even though it’s pretty basic. I’ll probably write another guide at some point to cover multiple recolours and images on a single object (for example, family photos with multiple coloured frames), but a lot of that was covered here. It’s a matter of adding new swatches and repeating the same steps above for each recolour – but I’ll likely go into more detail with another post later. Anyway, as always, good luck! 🙂
Tonight I was asked for help in creating custom thumbnail swatches to go with recoloured picture frames by the very same person who inspired the custom image sharpness post here. Since I’ve been so lazy procrastinating about creating custom thumbnails for my CC (which I’ve only now just gotten around to doing), I figured I may as well post a how-to on the subject. At least that way there’s no excuses for next time (unless I’m still procrastinating which, knowing me, is highly possible…)
This is a stripped-down version of the original guide found at Sims 4 Studio – all credit goes to OrangeMittens, Andrew, Bakie, and the rest of the crew at S4S for this. I just abbreviated it and added my own tips and observations at the end. There’s also instructions on what to do if you’re experiencing transparent swatches in Sims 4 Studio.
Put your .package file in your usual Mods folder. Load your game.
In the build/buy catalog, look at every swatch entry for your object. This will automatically generate thumbnails in S4S. You’re not placing the object in world, you’re just hovering your mouse cursor over and looking at each recolour from the buy catalog. (If you buy it and place it in-world and then try to change the colours that way, this won’t generate thumbnails). That’s it. Then close your game.
Open your .package file in S4S.
Click each numbered swatch to see the newly generated thumbnails (they will appear under the Catalog Thumbnail box).
Export thumbnail #1 and save to desktop.
Open thumbnail #1 in Gimp (or other picture editing software).
Add a new layer. Create text in this new layer – anything to identify it as “yours” (This will show up over the top of your thumbnails in the buy catalog – In the example above I chose the text RLH).
Hide or delete the original thumbnail image so only text (or your identifying mark) is showing.
Save (or use the option ‘Export As’ if you’re using Gimp) as a .png. Close Gimp.
Return to S4S. Click on the Tools tab > Modding > Catalog Thumbnail Overlay.
Navigate to your .png and select it.
You should then see your .png image over the top of all your custom thumbnails for each swatch.
Save .package and return it to your Mods folder. Load game to test.
If successful, this is an example of what you should see in-game. (Note that I deliberately left my swatch thumbnails as solid colours and didn’t export individual custom swatches as colours are referenced in the product description).
What to do if your thumbnail swatches are transparent.
The easiest thing you should do is try clearing your Thumbnail Cache – this will force the game to generate new ones (so don’t worry about screwing up your game). To do this, go into S4S > Tools > Clear Thumbnail Cache, or try deleting the file localthumbs.cache from your Documents\Electronic Arts\The Sims 4 folder (both methods do the same thing, they’re just different ways of doing it). Then restart your game.
After loading, repeat steps #1 – 4 listed as above: look at each recolour swatch from the buy catalog in game, and then going back into S4S and see if they show up this time. If they do, repeat the rest of the steps to create custom thumbnails. If they don’t, make sure S4S is looking for them in the right place.
Open S4S > Settings. Next to where it says Sims 4 Documents, make sure the path that follows reads Documents\Electronic Arts\The Sims 4 and NOTDocuments\Electronic Arts\The Sims 4 folder\Mods, or anything else.
If you’re still having problems, try this step here. Hopefully that solves it, and you should now have some professional looking thumbnails showing over your recolours in your game.
TIP: Instead of having to recreate the .png overlay for every recolour project (the overlay created in step #9), save it somewhere handy so you can use it again (unless you plan on changing your overlay design). That way for all future recolours you can bypass steps #5 – 9 as you already have an image created. You will still need to do steps #1 – 4, and #10 – 13 (generating thumbnails in game, and applying the overlays respectively) for each project, but applying the same .png will save time as catalog thumbnails are the same size and your .png will fit every project from here on out.
EDIT: As of Feb 8, 2019, I’ve had to completely rewrite the blog post that I did just yesterday since overnight with the update of my chosen preset so much had changed. Beyond that I also realised that after some good old fashioned trial and error (and after accidentally borking my game in the process) I could really simplify what I had written and make it far less complicated and user friendly, if only for my future forgetful self. So that’s what I intend to do. The original post showing examples of ReShade in action can be found here.
So before we get started, I guess I better explain, in my indelible and simplified way, what ReShade is. ReShade is a lighting mod that basically adds presets, or what I’d call “filters” for the game (It’s a lot like adding filters to photos and videos we use in real life to enhance them in some way). I know there’s probably a lot more tech-savvy way of explaining it, but from what I can tell that’s basically it. Once you install ReShade you can download and install presets (aka filters) at your discretion. There’s a LOT already out there to choose from, so I won’t go through them all.
Some presets only require ReShade to work. But others will also require you to download and install additional mods as well. One of these additional mods that seems pretty popular is called qUINT. qUINT includes a selection of shaders that feature things like blurry backgrounds, or sharper looking renders (generally clearer looking images), and more. Again, that’s an oversimplified statement, but all you need to know is that qUINT compliments ReShade nicely – and its quick and easy to install. Refer to the link for more information.
Before we go any further, the absolute first thing you should do before you install ANYTHING (including ReShade, qUIRK, or presets) is create a backup copy of your original game BIN folder (NOT the one in My Documents). As a general rule of thumb I’ve created a separate folder on my desktop specifically for game backups, but you may decide to save it someplace else, which is fine too. Your game path might read differently to mine depending on where you install it, but should read something like this:
Once you’ve copied your original folder to a safe location, you can now go ahead and download and install ReShade. Since I’m using a preset that already includes the ReShade folder I’m going to show you that one, because it’s easy to use, and it’s a lot less complicated than other methods of manual installation I’ve seen. Bear in mind that methods and requirements may differ depending on what preset you wish you use. Some presets are ONLY for taking photos, and are so effects-heavy that they will crash your game. Some can only be used with qUINT, and some only need ReShade to work. Be sure to read the information provided from your particular download link. And make sure to pay attention to which version of ReShade the creator suggests. Apparently some presets don’t work with older versions, or newer versions, so really pay attention to the instructions.
For the purpose of this explanation, I’m using the latest ReShade version 4.1.1 (Released January 23rd, 2019).
The preset I selected is called Movie Simsby Forced @ MTS. A few days ago I came across the previous version which was then named Real Sims (It was the name that really caught my attention and made me want to bother installing ReShade or presets in the first place). The updated version of this, Movie Sims, now also includes the Real Sims presets as an added bonus. This basically means that you get around sixteen (?) filters or looks to choose from, even if some are similar. Again, you don’t have to download this particular preset for your game, but since I liked the look of the screenshots so much I did, and I thoroughly recommend it.
Installing ReShade the easy way.
Obviously download and extract the Movie Sims.rar (I use 7-zip which is free and can be found here). You will see a folder inside called Game, and inside that another folder called Bin. Minimize that, then open up your Origin\Games directory (not the one found in My Documents but instead you’re looking under Program Files) which again should look something like this:
Note, this is not exactly the same path that the Movie Sims download page recommended (C:\Program Files (x86)\Origin\The Sims 4\Game\Bin) but since I couldn’t find the exact path they gave, I found my own which I figured was close enough. I tested my theory and it worked, so realistically either way seems to. Now select your downloaded Bin folder and drag and drop it into your existing installation folder Program Files…Game\Bin. Then start up your game. You should see a few rows of small text on your loading screen, as well as some colour difference in general. Load your game, then press the F9 key to bring up the ReShade menu. A window should pop up on the left hand side of your screen. If it did, great! You’ve done it! Play as usual and enjoy. But if not, you may have to uninstall and re-install the files manually. (You can read how-to here, or read below. For the most part I copied the information over for ease of access just in case the original page becomes inaccessible, but all credit to Forced/Cul @ Lover’sLab and MTS).
Again, if ReShade is now working you can skip this next part.
Manually installing ReShade.
Manually installing ReShade can be a little tricky, especially if you’re a tad clueless like me. Firstly, download ReShade (v4+) if you haven’t already. Right-click the application and Run as Administrator. Open your Game installation directory (C:\Program Files (x86)\Origin\The Sims 4\Game\Bin) and open your Bin folder (If you’re running x32 instead of x64, you’ll need to download the d3d9.dll file here and paste it into your Bin folder). During the ReShade installation process you should get a pop-up. Check the circle beside Direct3D 9 → then yes → Uncheck All → Ok, then close.
Download the Movie Sims preset from here (x64 or x32) and open/extract.
Place all real*.ini files inside …TheSims4\Game\Bin
Place lut.png and MultiLut_atlas.png, MultiLut_atlas2.png, and MultiLut_atlas3.png inside …TheSims4\Game\Bin\reshade-shaders\Textures (and replace).
Place all .fx files (LUT.fx … LumaSharpen.fx … MultiLUT.fx, MultiLUTz.fx, MultiLUTx.fx) in …\The Sims 4\Game\Bin\reshade-shaders\Shaders
Close all files and run the game. The original instructions read press the Home key for the ReShade menu, but it could have since changed to F9 with this recent update. If Home doesn’t work, F9 should.
How to change presets in game.
If you have more than one preset (and I think ReShade comes with a few?) then you can change them in-game very simply. Press the Home key or F9 on your keyboard to bring up the ReShade menu. A blie and black box will pop up on the left hand side of your screen. At the top of this box you will see various tabs; Home, Settings, Statistics, Log, About, DX9. Select Home.
Directly beneath the tabs will be the installation directory C:\Program Files (x86)\Origin Games… On the right hand side of that is a small arrow facing down. Press that. A list of presets will drop down that you can select from. You will see the changes immediately in your game on the rest of the screen.
If you don’t like a particular preset and want to tweak it to your personal tastes, you can do that too. Again, select the preset you wish to tweak, and then move your mouse down to the bottom half of the pop-up box to where you see edit global preprocessor definitions. There will be a collection of files with small arrows to their left. Select a file to expand it, and you’ll be given a variety of sliders to move left or right. I can’t say for sure how you go about saving your presets, but I didn’t bother saving mine to test. They do seem to stay active until you change them, but I really don’t know. Once you have finished tweaking, close the box to return to your game.
Uninstalling ReShade.
Here is where I ran into troubles and completely borked my game, so I can’t stress this enough: pay attention to what the download and uninstallation instructions say.
First, exit out of the game, and open your installation directory:
C:\Program Files (x86)\Origin\The Sims 4\Game\Bin
In the Bin folder, delete the reshade-Shaders folder, ReShade.ini, d3d9.dll, and the real*.ini presets.
That should be it. Technically, you should be able to delete the Bin folder and replace it with your earlier saved Bin folder (but I did that, and my game broke. Repairing didn’t work. So I had to move my Saves, Mods, and Tray folders out and do a complete re-install). Leaving ReShade in shouldn’t harm your game, and as far as I’m aware (don’t quote me on this), you probably could just delete the .ini presets and leave the ReShade shaders, but I could be wrong about that. I’m only writing what I’ve experienced so far which is admittedly limited. Maybe someone else can clarify that last point.
Where to find presets.
The beauty of Movie Sims, is that it allows you to create your own presets from them. I will say I tried, but I wasn’t that spectacular at it so I gave up. Luckily there’s plenty of presets already available that you can find and download with a simple Google search. Below is a short list of links that might be helpful, and some I really like the look of.


You must be logged in to post a comment.