

This sums up my current state after weeks of cataloging my entire Mods folder here.
Also…

The plight of just about every Sims player, ever.
(Credit: Voldesims).
This sums up my current state after weeks of cataloging my entire Mods folder here.
Also…
The plight of just about every Sims player, ever.
(Credit: Voldesims).
There are a lot of guides that already exist out there in cyberspace, so I’m not preaching anything new. But if you don’t feel like sifting through search results, or you prefer static images rather than pausing a YouTube video each step, then maybe you might find this useful. Note: I’ve included screenshots for every step of the way, but don’t be put-off by thinking recolours take a lot of time or effort. The whole process actually takes around five minutes or less (depending on the size of your project). I’ve just tried to make it as thorough as possible.
Before you begin, make sure you have already downloaded and installed Sims 4 Studio (S4S) from here. There’s instructions on how to manually install at the download link, but I prefer automatic installation (because I’m lazy). You will also need an image editing program. I use Gimp, but you could also use Photoshop or some other program; it just means you will have to tailor certain steps to suit.
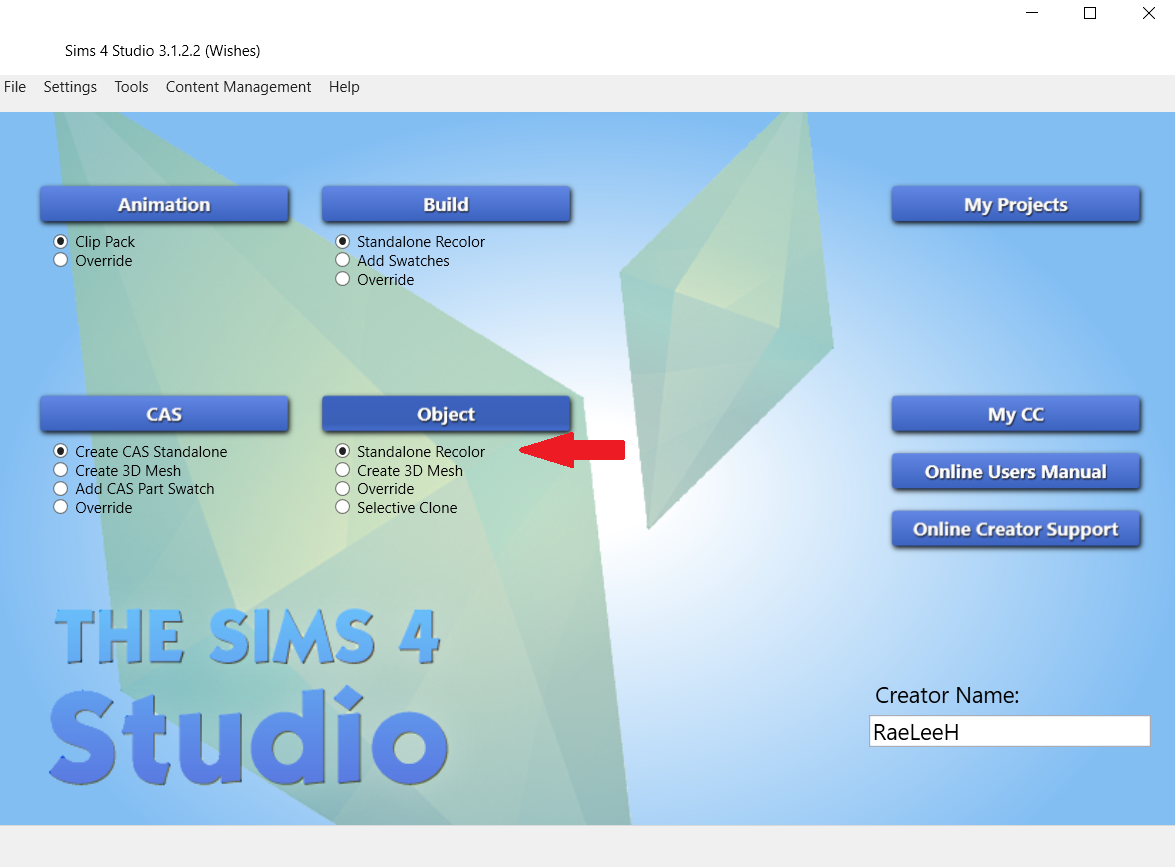
Step 1 – Open Sims 4 Studio. If this is your first time creating custom content, you will need to give yourself a creator name. You only need to do this once. Once you’ve done that, select Standalone Recolor, then select the Object button above it. Another window will open.

Step 2 – Scroll through the objects until you find the one you want. You can filter the objects by selecting the Game Pack button, or if you know the name of the object you can also type it in search. Then select Next.
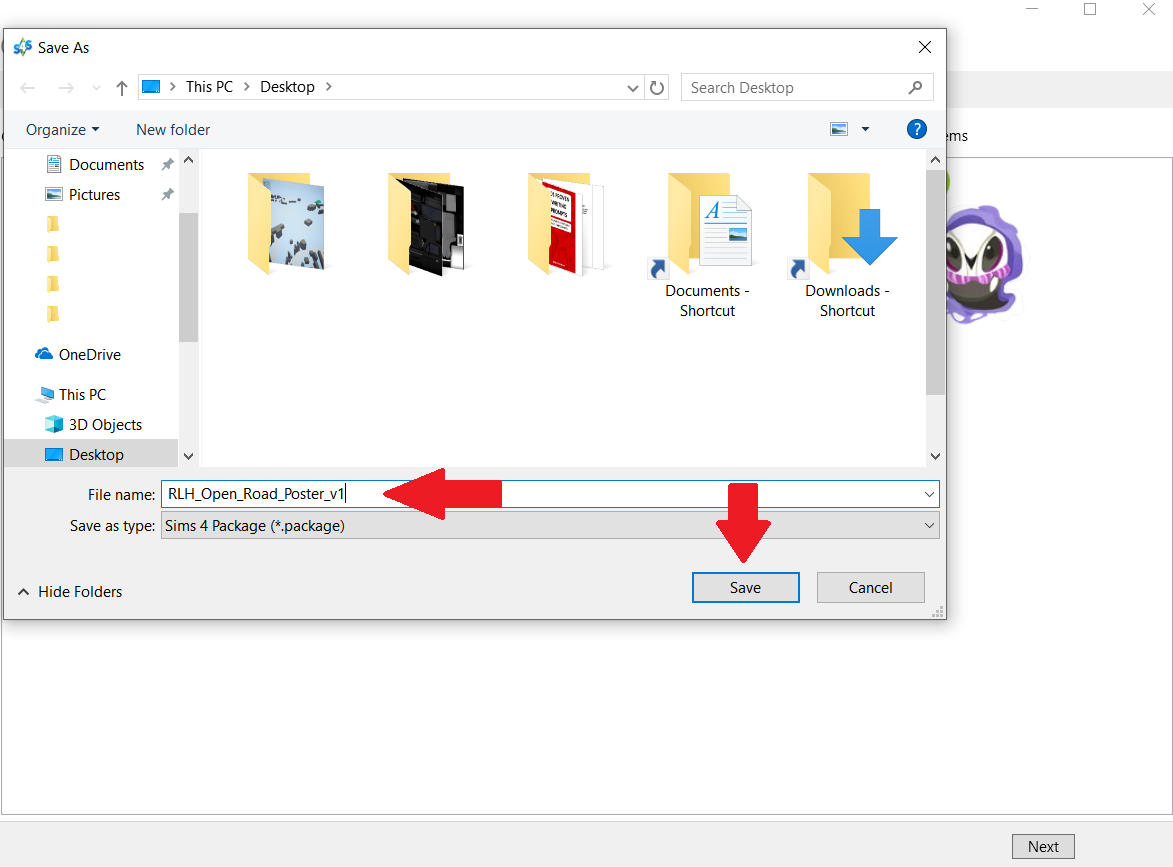
Step 3 – Give your project a name. This will be the name of the package file, NOT the name you see in the build/buy catalog. A general rule of thumb is to at least include your creator name (or some amalgam of it), as well as some sort of description of what your object is. For example, since my project is a poster I have included poster in the package file name, along with my abbreviated creator name RLH. After you’ve named it, select Save.
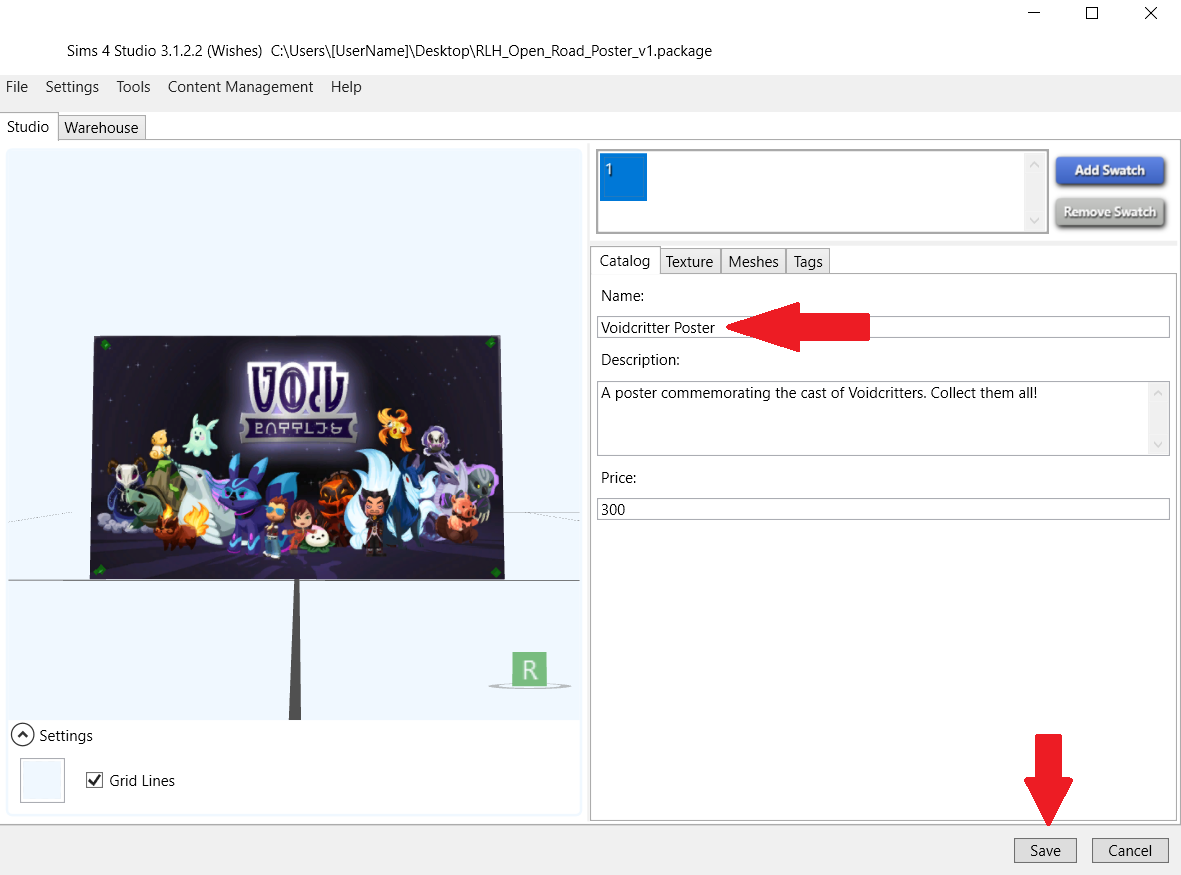
Step 4 – You should see the Studio window open (similar to above). Under the Catalog tab (the top red arrow) type in the name of your project. This is the name you will see in the build/buy catalog so choose wisely to make it easier to find in search (So for example, I changed the name of my project from Voidcritter Poster to RLH_Open Road poster. In the Description field, type in anything you’d like that will again show in the build/buy catalog in game. You can change the price or leave it as is. When you’re happy with it, select Save.

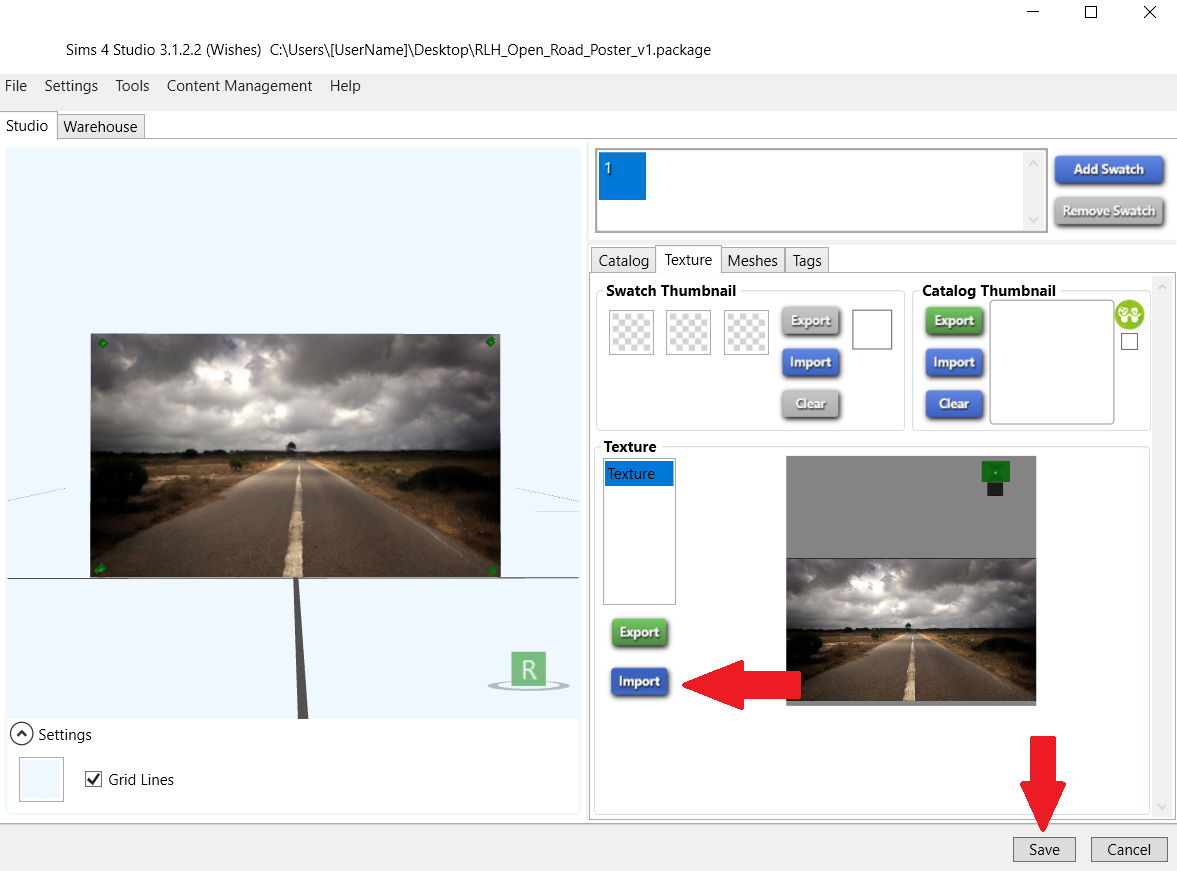
Step 5 – Next select the Texture tab (top red arrow). Beneath the texture window you will see the green Export button, and blue Import button. (For this tutorial those are the only buttons you need to worry about. Ignore the buttons under Catalog Thumbnail for now. Instructions on creating one of these has been covered in a previous tutorial and a link for it can be found at the bottom of this screen). Select the green Export button (middle red arrow).
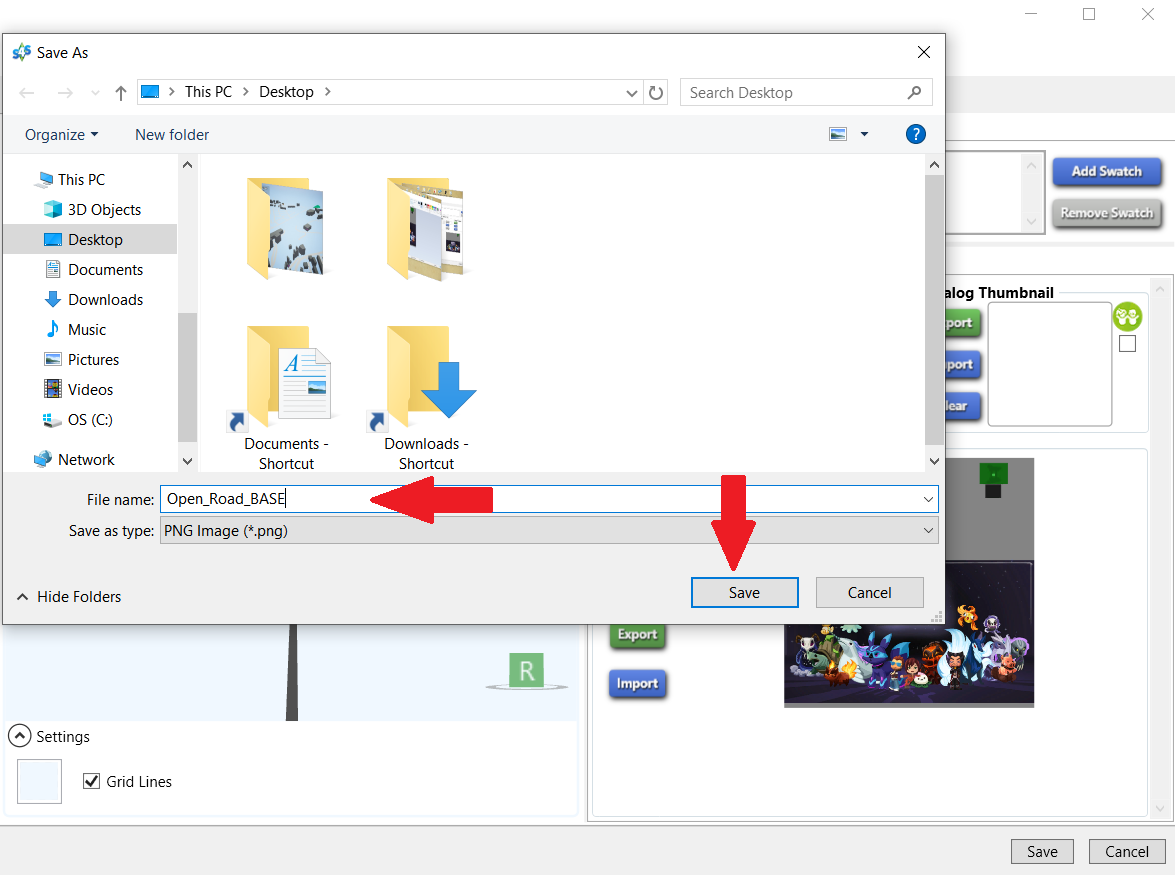
Step 6 – A window will pop up. Call your exported texture whatever you like as you will be editing it anyway. You don’t have to, but I always save it to desktop so that it’s easy to access. Then select Save.
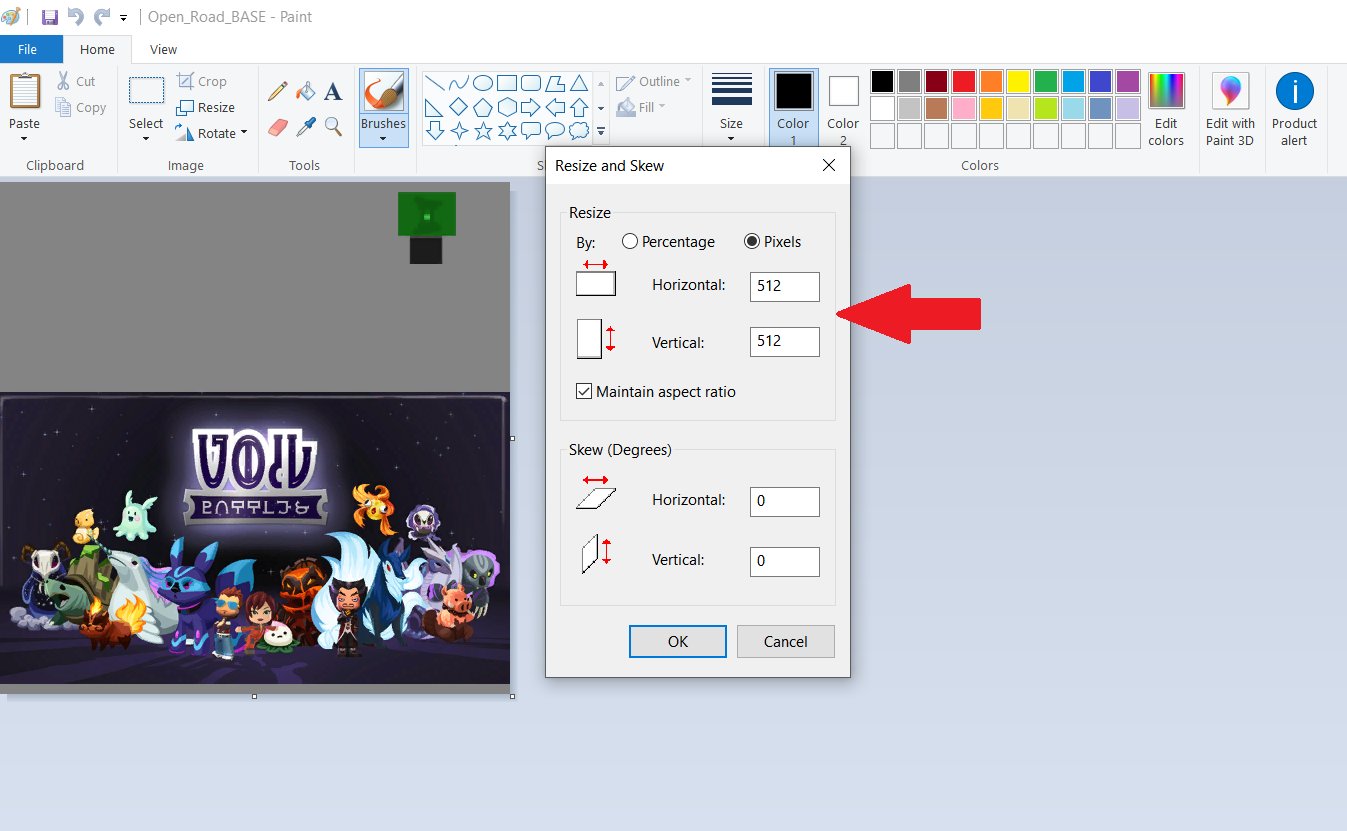
Step 7 – Minimize S4S and find your exported texture. Right-click and open it in MS Paint (or whatever editing program you wish). Resize your image to at least DOUBLE its original size. This ensures your image will appear clear in game. You can make your image 2048×2048 at max if you really want (don’t quote me on that), but I recommend against it. Generally 1024 pixels or less is more than sufficient for clear images, and won’t be so taxing on your graphics. After you have resized your image, select OK, then File > Save. Close Paint and open your newly resized export texture in Gimp.

Step 8 – If you haven’t got the option open already, press CTRL + L on your keyboard to open your Layers box. Right-click on your layer (right top arrow) and select ‘Add Alpha Channel’ (right bottom arrow. If the option is greyed out it means this is already available, so click anywhere to close that pop-up). On the left hand side (Toolbox) use Rectangle Select to select the part of the image we’re going to replace (the image in the red box). Try and stick to the image border lines as closely as possible for a cleaner recolour.

Step 9 – Once you have selected the image, press Delete on your keyboard to remove it. The image should now be replaced by an alpha/invisible window. Once you see this, go to Select > None.
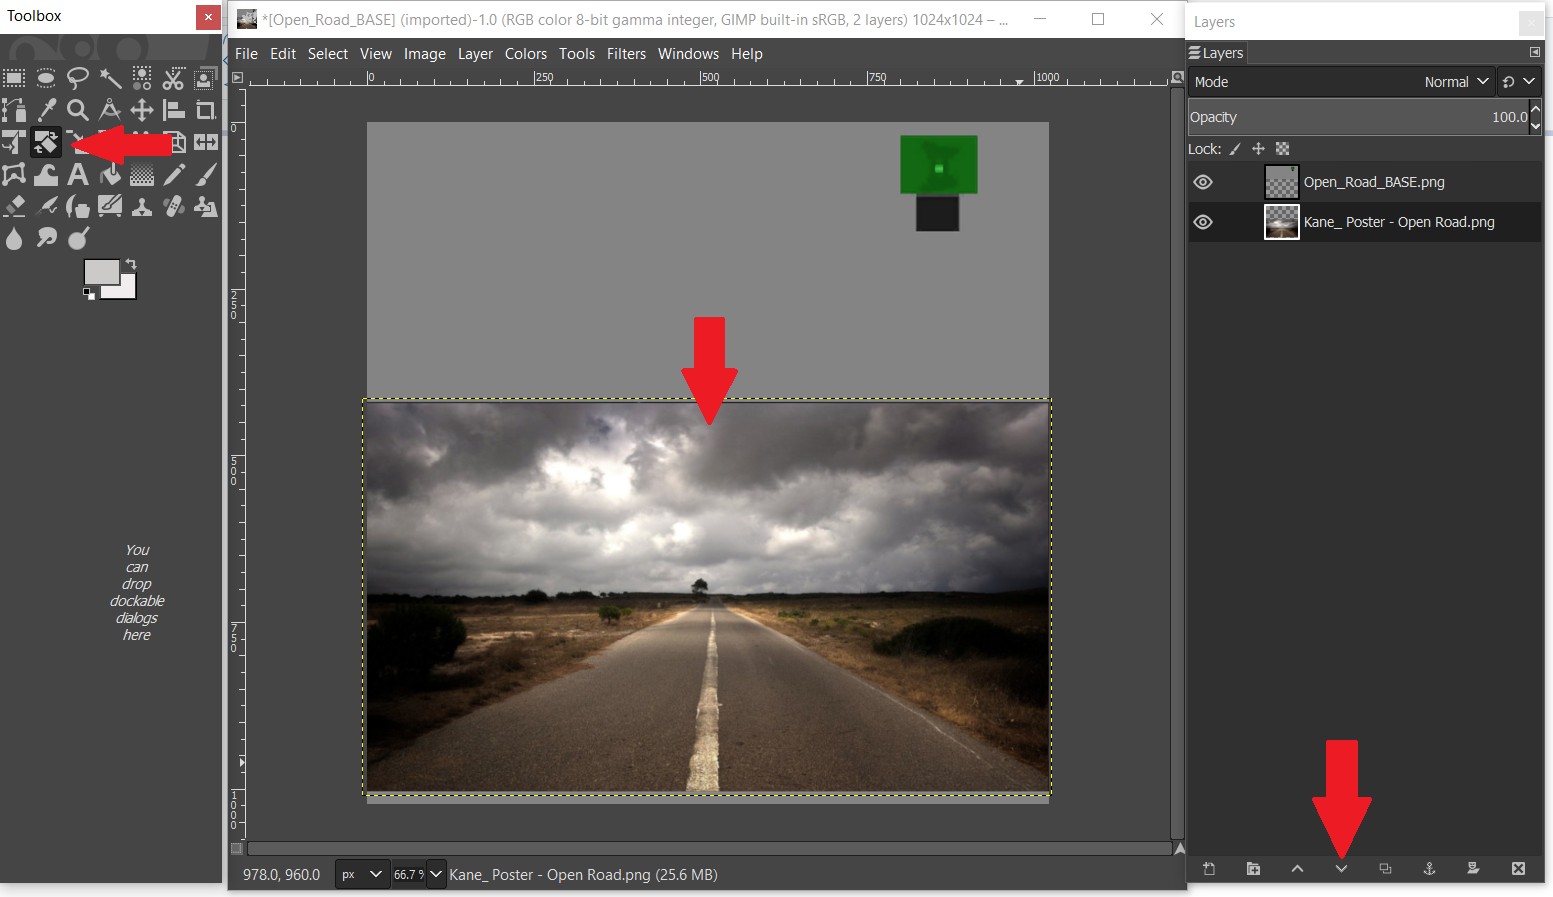
Step 10 – Drag your image from the desktop (or wherever you saved it) and drop it directly onto your poster. Use the Move Tool and Scale Tool to fit. Make sure it fits into that section that we previously deleted in step 9.
Optional: If your editing program allows layers, lower your image beneath the poster by selecting the Lower button (arrow down – beneath the red arrow on the bottom right hand side of the example picture). This will ensure part of the image doesn’t accidentally show on the back of the poster. This is optional however, as not all picture editing programs use layers.
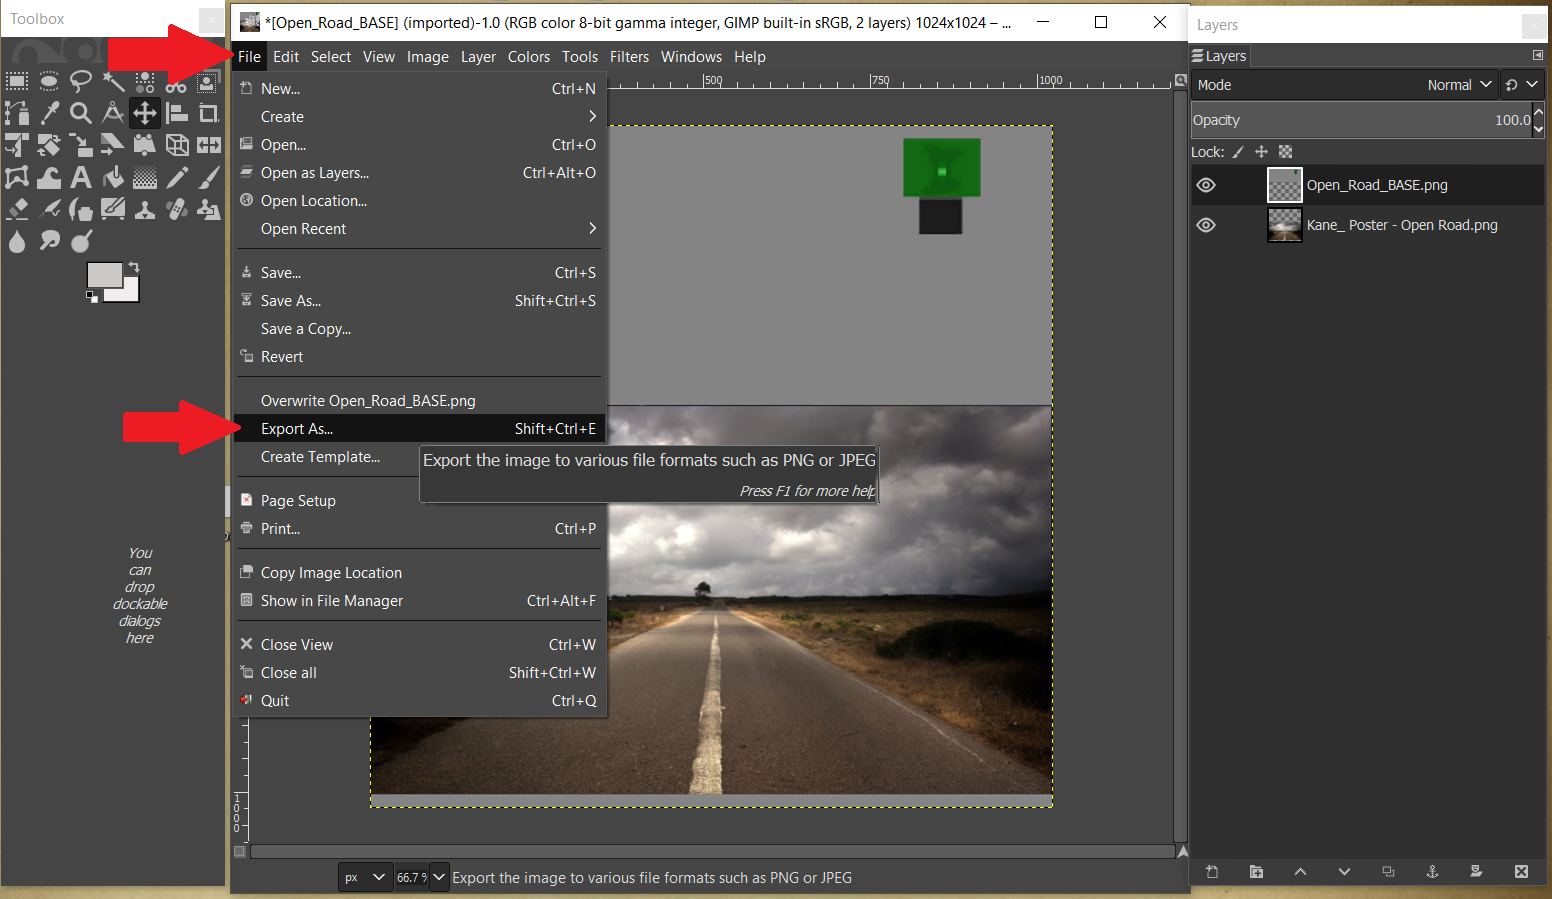
Step 11 – Once you are happy with the placement of your image, select File > Export As (In Gimp: if you try to Save As you will save an .xcf file which S4S won’t read. Export As saves the file to a .png which is ideal. If using another program, ensure the texture is saved as either .png or .jpeg). Again, ensure the image is easy to find. By default, I save to desktop.
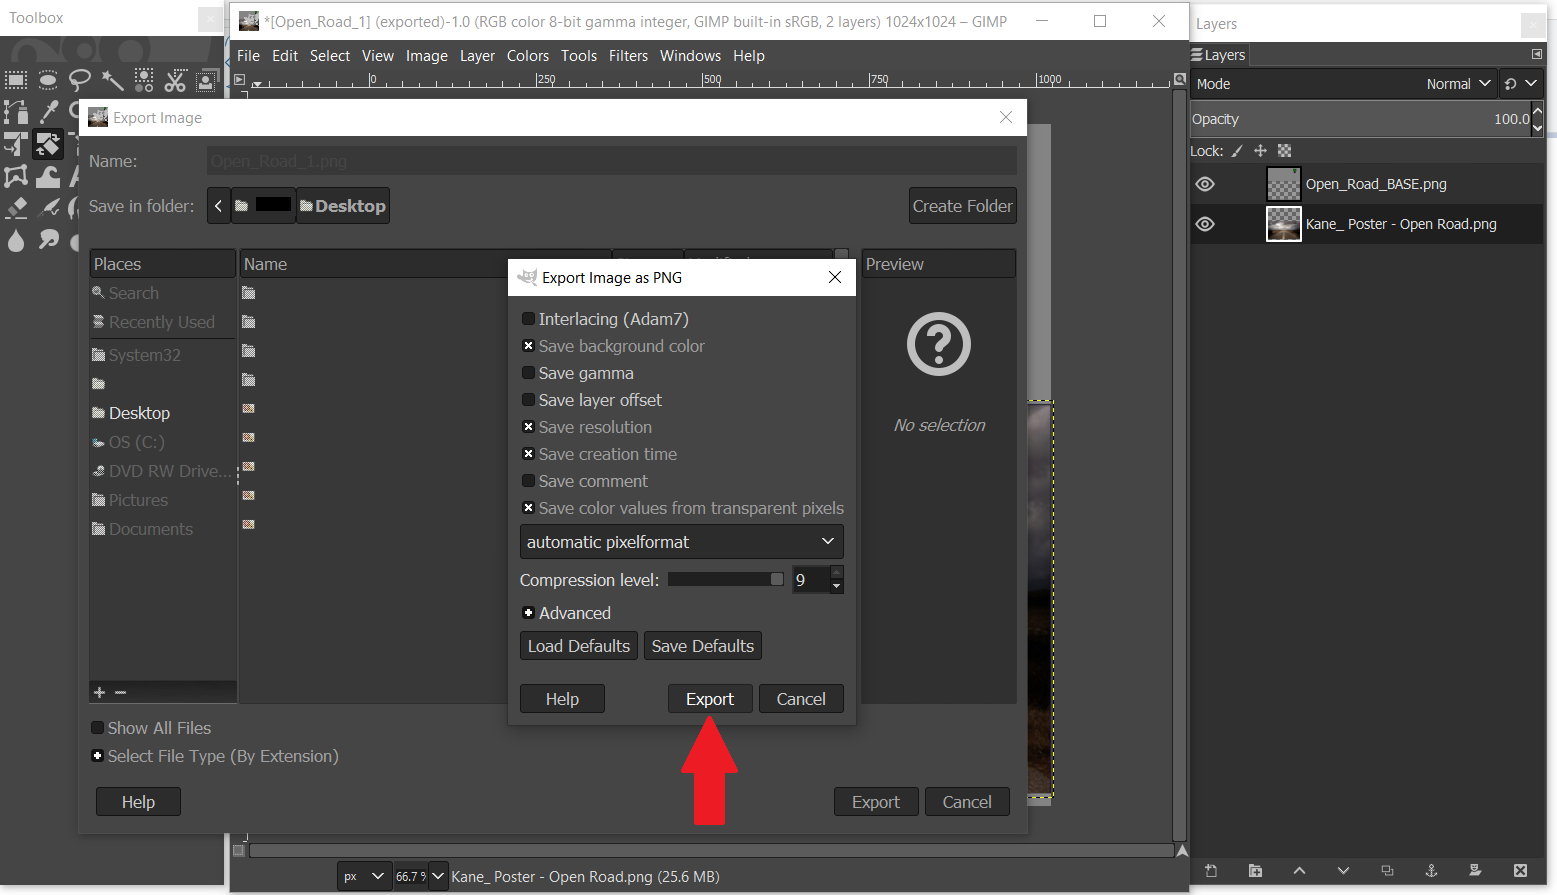
Step 12 – When a window pops up, Select the Export button. Then close Gimp.
Step 13 – Return to S4S (which we minimized in step 7). Select the blue Import button. Navigate to your image and select Open. You should immediately see the 3D poster example (on the left hand side) change from the original texture to your new edited texture. To inspect more closely; hold down the right mouse button and drag to rotate your object, scroll wheel mouse to zoom in/out, and hold the mouse button and drag to move poster around window. If you’re not happy with the image placement, or you wish to make changes, minimize S4S and re-open your image in Gimp. Repeat steps 11-13 until you are happy. To finish, select Save.
Step 14 – Close S4S and open your Mods folder (Documents \ Electronic Arts \ The Sims 4 \ Mods). Drag and drop your .package file in there. Then load your game, and search your build/buy catalog to test.
One last thing: If you want to make a custom thumbnail swatch for your new object (either to give your recolour a more “polished” look, or to make it easier to see in the build/buy catalog), see the previous tutorial here.
So that’s it! Hopefully this helps someone, even though it’s pretty basic. I’ll probably write another guide at some point to cover multiple recolours and images on a single object (for example, family photos with multiple coloured frames), but a lot of that was covered here. It’s a matter of adding new swatches and repeating the same steps above for each recolour – but I’ll likely go into more detail with another post later. Anyway, as always, good luck! 🙂

Tonight I was asked for help in creating custom thumbnail swatches to go with recoloured picture frames by the very same person who inspired the custom image sharpness post here. Since I’ve been so lazy procrastinating about creating custom thumbnails for my CC (which I’ve only now just gotten around to doing), I figured I may as well post a how-to on the subject. At least that way there’s no excuses for next time (unless I’m still procrastinating which, knowing me, is highly possible…)
This is a stripped-down version of the original guide found at Sims 4 Studio – all credit goes to OrangeMittens, Andrew, Bakie, and the rest of the crew at S4S for this. I just abbreviated it and added my own tips and observations at the end. There’s also instructions on what to do if you’re experiencing transparent swatches in Sims 4 Studio.
==============================================================

What to do if your thumbnail swatches are transparent.
The easiest thing you should do is try clearing your Thumbnail Cache – this will force the game to generate new ones (so don’t worry about screwing up your game). To do this, go into S4S > Tools > Clear Thumbnail Cache, or try deleting the file localthumbs.cache from your Documents\Electronic Arts\The Sims 4 folder (both methods do the same thing, they’re just different ways of doing it). Then restart your game.
After loading, repeat steps #1 – 4 listed as above: look at each recolour swatch from the buy catalog in game, and then going back into S4S and see if they show up this time. If they do, repeat the rest of the steps to create custom thumbnails. If they don’t, make sure S4S is looking for them in the right place.
Open S4S > Settings. Next to where it says Sims 4 Documents, make sure the path that follows reads Documents\Electronic Arts\The Sims 4 and NOT Documents\Electronic Arts\The Sims 4 folder\Mods, or anything else.
If you’re still having problems, try this step here. Hopefully that solves it, and you should now have some professional looking thumbnails showing over your recolours in your game.
TIP: Instead of having to recreate the .png overlay for every recolour project (the overlay created in step #9), save it somewhere handy so you can use it again (unless you plan on changing your overlay design). That way for all future recolours you can bypass steps #5 – 9 as you already have an image created. You will still need to do steps #1 – 4, and #10 – 13 (generating thumbnails in game, and applying the overlays respectively) for each project, but applying the same .png will save time as catalog thumbnails are the same size and your .png will fit every project from here on out.
As always, good luck! 🙂
EDIT: As of Feb 8, 2019, I’ve had to completely rewrite the blog post that I did just yesterday since overnight with the update of my chosen preset so much had changed. Beyond that I also realised that after some good old fashioned trial and error (and after accidentally borking my game in the process) I could really simplify what I had written and make it far less complicated and user friendly, if only for my future forgetful self. So that’s what I intend to do. The original post showing examples of ReShade in action can be found here.
So before we get started, I guess I better explain, in my indelible and simplified way, what ReShade is. ReShade is a lighting mod that basically adds presets, or what I’d call “filters” for the game (It’s a lot like adding filters to photos and videos we use in real life to enhance them in some way). I know there’s probably a lot more tech-savvy way of explaining it, but from what I can tell that’s basically it. Once you install ReShade you can download and install presets (aka filters) at your discretion. There’s a LOT already out there to choose from, so I won’t go through them all.
Some presets only require ReShade to work. But others will also require you to download and install additional mods as well. One of these additional mods that seems pretty popular is called qUINT. qUINT includes a selection of shaders that feature things like blurry backgrounds, or sharper looking renders (generally clearer looking images), and more. Again, that’s an oversimplified statement, but all you need to know is that qUINT compliments ReShade nicely – and its quick and easy to install. Refer to the link for more information.
Before we go any further, the absolute first thing you should do before you install ANYTHING (including ReShade, qUIRK, or presets) is create a backup copy of your original game BIN folder (NOT the one in My Documents). As a general rule of thumb I’ve created a separate folder on my desktop specifically for game backups, but you may decide to save it someplace else, which is fine too. Your game path might read differently to mine depending on where you install it, but should read something like this:
C:\Program Files (x86)\Origin Games\The Sims 4\Game\Bin
Once you’ve copied your original folder to a safe location, you can now go ahead and download and install ReShade. Since I’m using a preset that already includes the ReShade folder I’m going to show you that one, because it’s easy to use, and it’s a lot less complicated than other methods of manual installation I’ve seen. Bear in mind that methods and requirements may differ depending on what preset you wish you use. Some presets are ONLY for taking photos, and are so effects-heavy that they will crash your game. Some can only be used with qUINT, and some only need ReShade to work. Be sure to read the information provided from your particular download link. And make sure to pay attention to which version of ReShade the creator suggests. Apparently some presets don’t work with older versions, or newer versions, so really pay attention to the instructions.
For the purpose of this explanation, I’m using the latest ReShade version 4.1.1 (Released January 23rd, 2019).
The preset I selected is called Movie Sims by Forced @ MTS. A few days ago I came across the previous version which was then named Real Sims (It was the name that really caught my attention and made me want to bother installing ReShade or presets in the first place). The updated version of this, Movie Sims, now also includes the Real Sims presets as an added bonus. This basically means that you get around sixteen (?) filters or looks to choose from, even if some are similar. Again, you don’t have to download this particular preset for your game, but since I liked the look of the screenshots so much I did, and I thoroughly recommend it.
Installing ReShade the easy way.
Obviously download and extract the Movie Sims.rar (I use 7-zip which is free and can be found here). You will see a folder inside called Game, and inside that another folder called Bin. Minimize that, then open up your Origin\Games directory (not the one found in My Documents but instead you’re looking under Program Files) which again should look something like this:
C:\Program Files (x86)\Origin Games\The Sims 4\Game\Bin
Note, this is not exactly the same path that the Movie Sims download page recommended (C:\Program Files (x86)\Origin\The Sims 4\Game\Bin) but since I couldn’t find the exact path they gave, I found my own which I figured was close enough. I tested my theory and it worked, so realistically either way seems to. Now select your downloaded Bin folder and drag and drop it into your existing installation folder Program Files…Game\Bin. Then start up your game. You should see a few rows of small text on your loading screen, as well as some colour difference in general. Load your game, then press the F9 key to bring up the ReShade menu. A window should pop up on the left hand side of your screen. If it did, great! You’ve done it! Play as usual and enjoy. But if not, you may have to uninstall and re-install the files manually. (You can read how-to here, or read below. For the most part I copied the information over for ease of access just in case the original page becomes inaccessible, but all credit to Forced/Cul @ Lover’sLab and MTS).
Again, if ReShade is now working you can skip this next part.
Manually installing ReShade.
Manually installing ReShade can be a little tricky, especially if you’re a tad clueless like me. Firstly, download ReShade (v4+) if you haven’t already. Right-click the application and Run as Administrator. Open your Game installation directory (C:\Program Files (x86)\Origin\The Sims 4\Game\Bin) and open your Bin folder (If you’re running x32 instead of x64, you’ll need to download the d3d9.dll file here and paste it into your Bin folder). During the ReShade installation process you should get a pop-up. Check the circle beside Direct3D 9 → then yes → Uncheck All → Ok, then close.
Download the Movie Sims preset from here (x64 or x32) and open/extract.
Place all real*.ini files inside …TheSims4\Game\Bin
Place lut.png and MultiLut_atlas.png, MultiLut_atlas2.png, and MultiLut_atlas3.png inside …TheSims4\Game\Bin\reshade-shaders\Textures (and replace).
Place all .fx files (LUT.fx … LumaSharpen.fx … MultiLUT.fx, MultiLUTz.fx, MultiLUTx.fx) in …\The Sims 4\Game\Bin\reshade-shaders\Shaders
Close all files and run the game. The original instructions read press the Home key for the ReShade menu, but it could have since changed to F9 with this recent update. If Home doesn’t work, F9 should.

How to change presets in game.
If you have more than one preset (and I think ReShade comes with a few?) then you can change them in-game very simply. Press the Home key or F9 on your keyboard to bring up the ReShade menu. A blie and black box will pop up on the left hand side of your screen. At the top of this box you will see various tabs; Home, Settings, Statistics, Log, About, DX9. Select Home.
Directly beneath the tabs will be the installation directory C:\Program Files (x86)\Origin Games… On the right hand side of that is a small arrow facing down. Press that. A list of presets will drop down that you can select from. You will see the changes immediately in your game on the rest of the screen.
If you don’t like a particular preset and want to tweak it to your personal tastes, you can do that too. Again, select the preset you wish to tweak, and then move your mouse down to the bottom half of the pop-up box to where you see edit global preprocessor definitions. There will be a collection of files with small arrows to their left. Select a file to expand it, and you’ll be given a variety of sliders to move left or right. I can’t say for sure how you go about saving your presets, but I didn’t bother saving mine to test. They do seem to stay active until you change them, but I really don’t know. Once you have finished tweaking, close the box to return to your game.
Uninstalling ReShade.
Here is where I ran into troubles and completely borked my game, so I can’t stress this enough: pay attention to what the download and uninstallation instructions say.
First, exit out of the game, and open your installation directory:
C:\Program Files (x86)\Origin\The Sims 4\Game\Bin
In the Bin folder, delete the reshade-Shaders folder, ReShade.ini, d3d9.dll, and the real*.ini presets.
That should be it. Technically, you should be able to delete the Bin folder and replace it with your earlier saved Bin folder (but I did that, and my game broke. Repairing didn’t work. So I had to move my Saves, Mods, and Tray folders out and do a complete re-install). Leaving ReShade in shouldn’t harm your game, and as far as I’m aware (don’t quote me on this), you probably could just delete the .ini presets and leave the ReShade shaders, but I could be wrong about that. I’m only writing what I’ve experienced so far which is admittedly limited. Maybe someone else can clarify that last point.
Where to find presets.
The beauty of Movie Sims, is that it allows you to create your own presets from them. I will say I tried, but I wasn’t that spectacular at it so I gave up. Luckily there’s plenty of presets already available that you can find and download with a simple Google search. Below is a short list of links that might be helpful, and some I really like the look of.
Pastoral Haunting Redux, Mountain Music, Music Mountain Redux, and Murder Mystery by Fuchsiateasims.
Rainy Day ReShade by Bloody Mary.
For Blood of Leaves by Rogodard.
Reshade Preset by RemusSims.
Vinatge Palms by Harrie.
So that’s it, and good luck! 🙂
EDIT: As of Feb 8. 2019, I’ve had to completely rewrite this post since the preset I was using (and method of installation) has changed. Added to that I felt this post just needed simplifying. So I’ve taken much of the technical information previously included here and moved it over to the imaginatively named ReShade Pt 2.
Since I’ve just returned to the land of the Sims it comes as no surprise that I’m a recent convert to Reshade. I’d seen plenty of amazing pictures but thought it was too complicated, and unneccessary, for me. Then the other day I came across a preshade that made me finally decide to take the plunge. After a little testing I decided to write this info down because knowing me I’m likely to forget. And since I’m not as tech-savvy as I used to be, I figured dumbing it down would help me understand should I need to come back to it later. Maybe it might be of interest to someone else too.
So instead of this post being something between a review and a quasi-guide, I’m leaving the guide part for Pt 2 and focusing on the visual aesthetics here. If just if you’re like me and pretty new to it all, Reshade is a lighting modification and visual enhancer for your game. When I came across a preset called “Real Sims” (by Cul over at Lover’s Lab and Forced at MTS4) I just had to have it (NOTE: *The name Real Sims has since been changed to Movie Sims with a recent update, which adds new presets and includes the older ‘real’ presets). Now that I have spent a few days playing and testing it out, I’m going to rant my ass off about it all here.
Personally I’ve always hated the look of The Sims. To me the game itself just looks cartoonish. With the painted-on clothing and oversized objects it sometimes feels like a game built for kids, not teenagers, and certainly not for adults no matter how much adult CC I manage to cram in. As much as I tried to make the game look realistic, anything that deviated too much from the standard vanilla style just stood out. Highly detailed skins looked like they didn’t belong in the same game against simple and featureless backgrounds; visually it was too distracting. So reluctantly I forced myself to embrace Maxis Match. I’m one of those players that need things to match where possible or end up with some kind of psychotic eye-twitch! Then I came across the (then named) Real Sims preset and was completely taken in by the name. The pictures provided looked more realistic than the base game, even if they weren’t to the level of Unreal Engine 3D models (As much as I hold out hope for something like that for The Sims 5, its probably never going to happen). I had to try it out for myself. So I did.

Straight off the bat, the cartoon look was muted. I won’t say gone completely, but certainly not as in-your-face as before. I didn’t even realise just how bright and childish the game looked until I took ReShade back out again. And the only reason I did that was to test my theories on the uninstallation process… I’m the kind of person that has to burn my hand on the stove just to find out for myself that it’s hot. And naturally with all that screwing around in my game files, I screwed up my game. BUT I didn’t lose anything – I would have been pissed as hell if I had, especially due to my own incompetence.
I think I’ve mentioned it elsewhere on the site, but it begs repeating anyway: Whether you download CC or run a completely mod-free game, REGULARLY create backups of your game (Mods, Saves, and Tray folders). That way if anything goes wrong in your game you won’t lose anything. I really wish I’d learned that lesson years ago, but it’s served me well ever since.
Anyway, I think the worst part about installing ReShade is the fact that I may have to start a new game yet again not all that long after starting the last. The difference between my old screenshots and the new ones is too extreme to ignore. I’m kind of bummed by that, but also pretty happy at the same time. I don’t think I’m going to feel quite so strange watching and writing about sex and death and torture all that other beautiful agony I love to inflict on my creations with such bright and colourful pictures. Finally things feel like they match, or at least better than they did before. So now I have to restrain the urge to install ALL the presets I like and risk having all my screeshots disconnect. Maybe I would have been better off not installing ReShade or Movie Sims in the first place, but I don’t regret it. Not yet anyway 😉

You must be logged in to post a comment.